In
Part 1 of this series we introduced a design pattern for grid computing on Azure and in
Part 2 we wrote the code for a fraud scoring grid computing application named Fraud Check. Here in Part 3 we'll run the application, first locally and then in the cloud.
The framework we're using is
Azure Grid, the community edition of the Neudesic Grid Computing Framework.
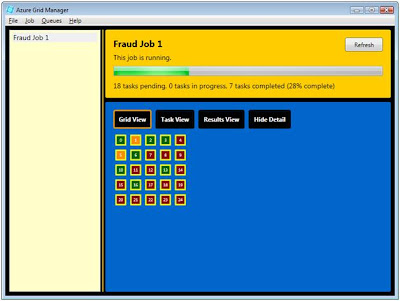
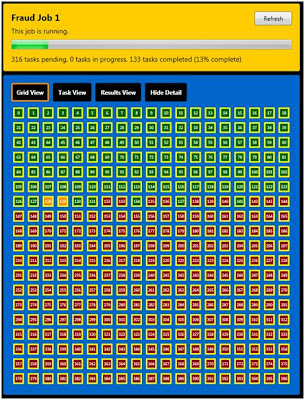
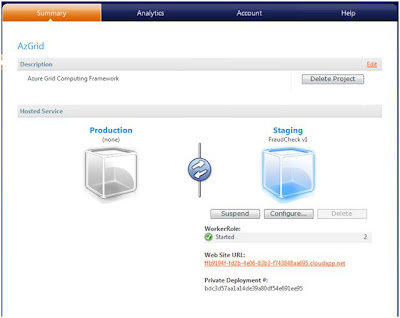
We'll need to take care of a few things before we can run our grid application--such as setting up a tracking database and specifying configuration settings--but here's a preview of what we'll see once the application is running in the cloud:
Let's get our set up out of the way so we can start running.
The Grid Application Solution StructureAzure Grid provides you with a base solution template to which you add application-specific code. Last time, we added the code for the Fraud Check grid application but didn't cover the solution structure itself. Let's do so now.
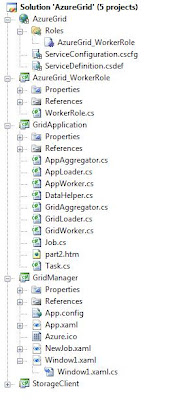
Our grid computing solution has both cloud-side software and enterprise-side software. The Azure Grid framework holds all of this in a single solution, shown below. So what's where in this solution?
• The GridApplication project contains the application-specific code we wrote in Part 2. As you'll recall, there were 3 pieces of code to write: task code, a loader, and an aggregator. The other projects in the solution host your application code: some of that code will execute cloud-side and some will execute on-premise.
• The Azure-based grid worker code is in the AzureGrid and AzureGrid_WorkerRole projects. This is a standard Azure hosted application with a worker role that can be deployed to an Azure hosting project using the Azure portal. Your task application code will be executed here.
• The enterprise-side code is in the GridManager project. This is the desktop application used for launching and monitoring grid jobs. It also runs your loader code and aggregator code in the background.
• The StorageClient project is a library for accessing cloud storage, which derives from the Azure SDK StorageClient sample. Both the cloud-side grid worker and on-premise grid manager software make use of this library.
Running the cloud-side and on-premise side parts of the solution is simple:
• To run the Grid Manager, right-click the Grid Manager project and select Debug > Start.
• To run the Grid Worker on your local machine using the local Developer Fabric, right-click the AzureGrid project and select Debug > Start.
• To run the Grid Worker in the Azure cloud, follow the usual steps to publish a hosted application to Azure for the AzureGrid project using the Azure portal.
For testing everything locally, you may find it useful to set your startup projects to both AzureGrid and Grid Manager so that a single F5 launches both sides of the application.
Setting up a Local DatabaseAzure Grid tracks job runs, tasks, parameters, and results in a local SQL Server or SQL Server Express database (2005 or 2008). The project download on CodePlex includes the SQL script for creating this database.
Configuring the SolutionBoth the cloud-side and on-premise parts of the solution have a small number of configuration settings to be attended to, the most important of which relate to cloud storage.
Cloud-side Grid Worker settings are specified in the AzureGrid project's ServiceConfiguration.cscfg file as shown below.
• ProjectName: the name of your application
• TaskQueueName: the name of the queue in cloud storage used to send tasks and parameters to grid workers.
• ResultsQueueName: the name of the queue in cloud storage used to receive results from grid workers.
• QueueTimeout: how long (in seconds) a task should take to execute before its task is re-queued for another worker.
• SleepInterval: how long (in seconds) a grid worker should sleep between checking for new tasks to execute.
• QueueStorageEndpoint: the queue storage endpoint for your cloud storage project or your local developer storage.
• AccountName: the name of your cloud storage project.
• AccountSharedKey: the storage key for your cloud storage project.
<ServiceConfiguration serviceName="AzureGrid" xmlns="http://schemas.microsoft.com/ServiceHosting/2008/10/ServiceConfiguration">
  <Role name="WorkerRole">
    <Instances count="10"/>
    <ConfigurationSettings>
      <Setting name="ProjectName" value="FraudCheck"/>
      <Setting name="TaskQueueName" value="grid-tasks"/>
      <Setting name="ResultsQueueName" value="grid-results"/>
      <Setting name="QueueTimeout" value="60"/>
      <Setting name="SleepInterval" value="10"/>
      <Setting name="QueueStorageEndpoint" value="http://queue.core.windows.net"/>
      <Setting name="AccountName" value="mystorage"/>
      <Setting name="AccountSharedKey" value="Z86+YKIJwKqIwnnS2uVw3mvlkVKMjfQcXawiN1g83JTRycaRwwSSKwhnaNsAw3W9zNW7LxGHy2MCJ1qQMX+J4g=="/>
    </ConfigurationSettings>
  </Role>
</ServiceConfiguration>
Configuration settings for the on-premise Grid Manager are specified in the Grid Manager project's App.Config file. Most of the settings have the same names and meaning as just described for the cloud-side configuration file and need to specify the same values. There's also a connection string setting for the local SQL Server database used for grid application tracking.
<?xml version="1.0" encoding="utf-8" ?>
<configuration>
  <appSettings>
    <add key="ProjectName" value="FraudCheck"/>
    <add key="TaskQueueName" value="grid-tasks"/>
    <add key="ResultsQueueName" value="grid-results"/>
    <add key="QueueTimeout" value="60"/>
    <add key="SleepInterval" value="10"/>
    <add key="QueueStorageEndpoint" value="http://queue.core.windows.net"/>
    <add key="AccountName" value="mystorage"/>
    <add key="AccountSharedKey" value="Z86+YKIJwKqIwnnS2uVw3mvlkVKMjfQcXawiN1g83JTRycaRwwSSKwhnaNsAw3W9zNW7LxGHy2MCJ1qQMX+J4g=="/>
    <add key="GridDatabaseConnectionString" value="Data Source=.\SQLEXPRESS;Initial Catalog=AzureGrid;Integrated Security=SSPI"/>
  </appSettings>
</configuration>
Testing and Promoting the Grid Application Across EnvironmentsSince grid applications can be tremendous in scale, you certainly want to test them carefully. In an Azure-based grid computing scenario, I recommend the following sequence of testing for brand new grid applications:

1. Developer Test.
Test the grid application on the local developer machine with a small number of tasks. Here your focus is verifying that the application does what it should and the right data is moving between the grid application and on-premise storage.
• For cloud computation, the Grid Application executes on the local Developer Fabric.
• For cloud storage, the local Developer Fabric is used.
The Grid Manager of course executes on the local machine which is always the case.
2. QA Test.
Test the application with a larger number of tasks using multiple worker machines, still local. The goal is to verify that what worked in a single-machine environment also works in a multiple machine environment using cloud storage.
• For cloud computation, the Grid Application executes on the local Developer Fabric, but on multiple local machines.
• For cloud storage, an Azure Storage Project is used.
Note that while this is still primarily a local test, we're now using Azure cloud storage. This is necessary as we wouldn't be able to coordinate work across multiple machines otherwise.
3. Staging. Deploy the grid application to Azure hosting in the Staging environment and run the application with a small number of tasks. In this phase you are verifying that what worked locally also works with cloud-hosting of the application.
• For cloud computation, the grid application is hosted in an Azure hosting project - Staging.
• For cloud storage, an Azure Storage Project is used.
4. Production. Now you're ready to promote the application to the Azure hosting Production environment and run the application with a full workload.
• For cloud computation, the grid application is hosted in an Azure hosting project - Production.
• For cloud storage, an Azure Storage Project is used.
You can use Azure Manager to monitor the grid application is running as it should.
A Local Test RunNow we're all set to try a local test on our developer machine. As per our test plan, we'll initially test with a small workload on the local developer machine.
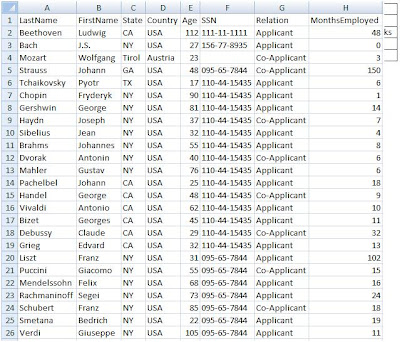
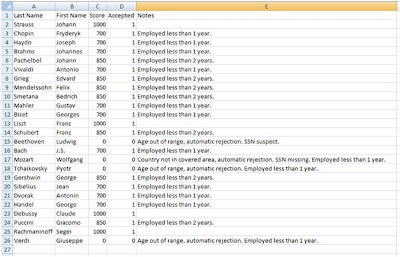
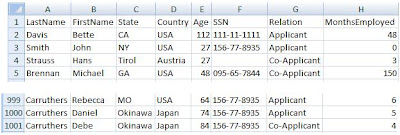
The input data is the CSV worksheet shown below which was created in Excel and saved as a CSV file. The FraudCheck application expects this input file to reside in the account where GridManager.exe launches from. We'll use 25 records in this test.
Ensure your database is set up and that your cloud-side and enterprise-side configuration settings reflect local developer storage.
Build the application and launch both the AzureGrid project and the GridManager project.
The AzureGrid project won't display anything visible, but you can check it is operating via the Developer Fabric UI if you wish.
The GridManager application is a WPF-based console that looks like this after launch:
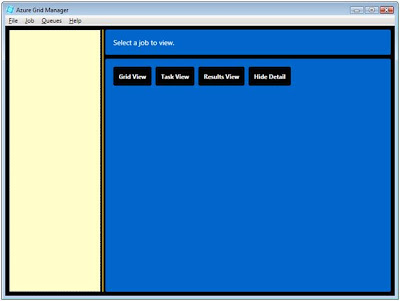
To launch a job run of your application, select Job > New Job from the menu. In the dialog that appears, give your job a name and description.
Click OK and you will see the job has been created but is not yet running. The job panel is red to indicate the job has not been started.
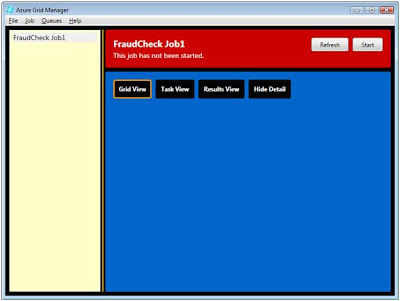
Now we're ready to kick off the grid application. Click the Start button, and shortly you'll see the job panel turn yellow and a grid of tasks will be displayed.
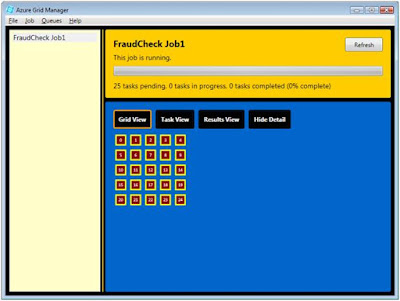
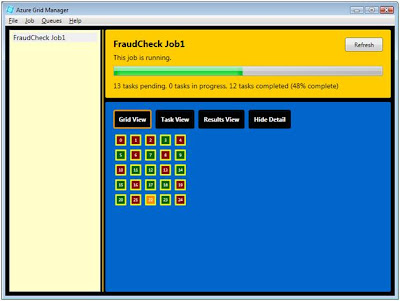
The display will update every 10 seconds. Soon you'll see some tasks are red, some are yellow, and some are green. Tasks are red while pending, yellow while being executed, and green when completed.
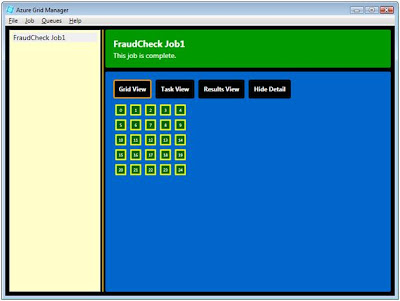
When all tasks are completed, the job panel will turn green.
With the grid application completed, we can examine the results. Fraud Check was written to pull its input parameters from an input spreadsheet and write its results to an output spreadsheet. Opening the newly created output spreadsheet, we can see the grid application has created a score, explanatory text, and an approval decision for each of the input records.
 Viewing the Grid
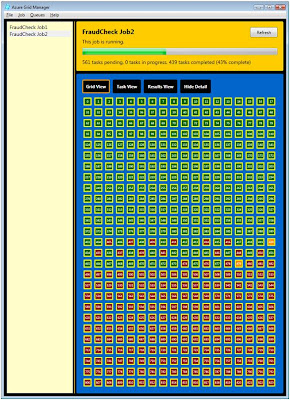
In the test run we just performed, you saw Grid View, where you can get an overall sense of how the grid application is executing. Each box represents a grid task and shows its task Id. Below you can see how Grid View looks with a larger number of tasks.
• Tasks in red are pending, meaning they haven't been executed yet. These tasks are still sitting in the task queue in cloud storage where the loader put them. They haven't been picked up by a grid worker yet.
• Tasks in yellow are currently executing. You should generally see the same number of yellow boxes as worker role instances.
• Tasks in green are completed. These tasks have been executed and their results have been queued for the aggregator to pick up.
In addition to the grid view, you can also look at tasks and results. The Grid View, Task View, and Results View buttons take you to different views of the grid application.
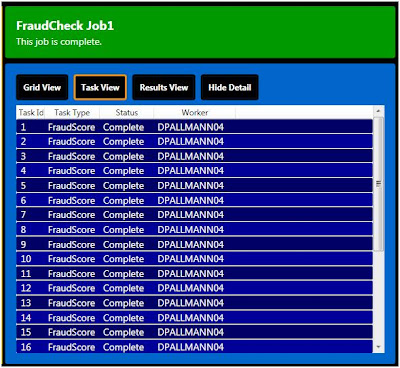
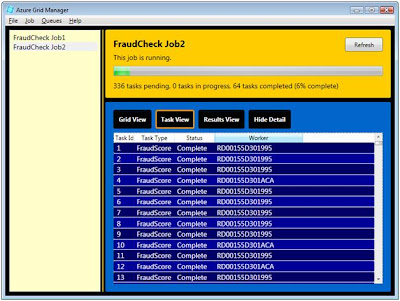
Viewing Tasks During or after a job run, you can view tasks by clicking the Task View button. The Task View shows a row for each task displaying its Task Id, Task Type, Status, and Worker machine name. When you're running locally you'll always see your own local machine name listed, but when running in the cloud you'll see the names of the specific machine in the cloud executing each task.
 Viewing Results
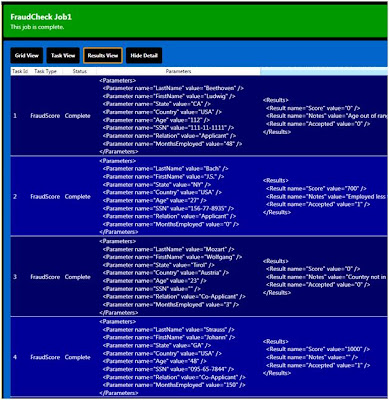
Result View is similar to Task View--one row per task--but shows you the input parameters and results for each task, in XML form. You may want to expand the window to see the information fully.
 Running the Grid Application in the Cloud
We've seen the grid application work on a local machine, now let's run it in the cloud. That requires us to change our configuration settings to use a cloud storage project rather than local developer storage; and also to deploy the AzureGrid project to a cloud-hosted application project.
The steps to deploy to the cloud are the same as for any hosted Azure application:
1. Right-click the AzureGrid project and select Publish.
2. On the Azure portal, go to your hosted Azure project and click the Deploy button under Staging to upload your application package and configuration files.
3. Click Run to run your instances.
Next, prepare your input. In our local test run the input to the application was a spreadsheet containing 25 rows of applicant information to be processed. This time we'll use a larger workload of 1,000 rows.
We only need to launch the Grid Manager application locally this time since the cloud-side is already running on the Azure platform.
Again we kick off a job by selecting Job, New Job from the Azure Manager menu. As before, we Click OK to complete the dialog and then click Start to begin the job. The loader generates 1,000 tasks which you can watch execute in Grid View.
Switching to Task View, you can see the machine names of the cloud workers that are executing each task.
Even before the grid application completes you can start examining results through Results View (shown earlier).

With the job complete, cloud storage is already empty. We also suspend the deployment running in the cloud since there is no work for it to avoid accruing additional compute charges.
Once the application completes, the expected output (an output CSV file in the case of FraudCheck) is present and has the expected number of rows and results for each.

we can see 1,000 rows were processed, but the records aren't in the same order. That's normal: we can't control the order of task execution nor are we concerned with it as each task is atomic in nature. That's one reason you'll typically copy some of the input parameters to your output, to allow correlation of the results.
Performance and TuningIt's difficult to assess the performance of grid computing applications on Azure today because we are in a preview period where the number of instances a developer can run in the cloud is limited to 2 per project.
There is one way to run more than 2 instances of your grid computing application today, and that's to host your grid workers in more than one place. You can use multiple hosted accounts, perhaps teaming up with another Azure account holder. You can also run some workers locally. This works because the queues in cloud storage are the communication mechanism between grid workers and the enterprise loader/aggregator. As long as you use a common storage project, you can diversify where your grid workers reside.
We can also expect some things that are generally true of grid computing applications to be true on Azure: for example, compute-intensive applications are likely to bring the greatest return on a grid computing approach.
As we move to an expected Azure release by year's end, we should be able to collect a lot of meaningful data about grid computing performance and how to tune it.


