Wednesday, April 24, 2019

Create and Host a Cross-Platform Web Site on ASP.NET Core

This is the second post in a series on .NET Cross-Platform Support. In my first post, I covered how to create, build, and deploy a console command in .NET Core for Windows, Linux, and MacOS. In today's post, I'll cover how to create a web site with ASP.NET Core and deploy it on both Windows and Linux.

If you're going to follow along, you'll need to install the .NET Core SDK. I'm doing my development with .NET Core 2.2 and Visual Studio Code on Windows, but you could just as easily do the same on Linux or MacOS.

The web site we'll create is a simple one-page site that performs conversions between different units of measurement, such as from miles to kilometers.

Development


Creating an ASP.NET MVC Project

We'll use the dotnet new command to create a starter project. I want to use MVC, so we'll request the MVC template.We'll specify the folder and project name convert.

dotnet new mvc -o convert


This creates a folder named convert. Within that folder are our project files along with subfolders.


Coding the Site

Fire up Visual Studio Code and use Open Folder to open the convert folder that was just created.

If you're new to ASP.NET Core, let's take a moment to familiarize ourselves with the project that has been created. Keep in mind this MVC project is only one of many ASP.NET Core project tempaltes
you can use.

Project Structure

In the convert folder, there is Program.cs and Startup.cs. Program.cs contains function Main, which is where execution begins. It creates a WebHost, and references the Startup class.

using System;
using System.Collections.Generic;
using System.IO;
using System.Linq;
using System.Threading.Tasks;
using Microsoft.AspNetCore;
using Microsoft.AspNetCore.Hosting;
using Microsoft.Extensions.Configuration;
using Microsoft.Extensions.Logging;

namespace convert
{
    public class Program
    {
        public static void Main(string[] args)
        {
            CreateWebHostBuilder(args).Build().Run();
        }

        public static IWebHostBuilder CreateWebHostBuilder(string[] args) =>
            WebHost.CreateDefaultBuilder(args)
                .UseStartup<Startup>();

Startup.cs contains the initialization code for the WebHost. This refactoring of ASP.NET is extremely modular and extensible, and includes a built-in dependency injection system.

using System;
using System.Collections.Generic;
using System.Linq;
using System.Threading.Tasks;
using Microsoft.AspNetCore.Builder;
using Microsoft.AspNetCore.Hosting;
using Microsoft.AspNetCore.Http;
using Microsoft.AspNetCore.HttpsPolicy;
using Microsoft.AspNetCore.Mvc;
using Microsoft.Extensions.Configuration;
using Microsoft.Extensions.DependencyInjection;

namespace convert
{
    public class Startup
    {
        public Startup(IConfiguration configuration)
        {
            Configuration = configuration;
        }

        public IConfiguration Configuration { get; }

        // This method gets called by the runtime. Use this method to add services to the container.
        public void ConfigureServices(IServiceCollection services)
        {
            services.Configure<CookiePolicyOptions>(options =>
            {
                // This lambda determines whether user consent for non-essential cookies is needed for a given request.
                options.CheckConsentNeeded = context => true;
                options.MinimumSameSitePolicy = SameSiteMode.None;
            });


            services.AddMvc().SetCompatibilityVersion(CompatibilityVersion.Version_2_2);
        }

        // This method gets called by the runtime. Use this method to configure the HTTP request pipeline.
        public void Configure(IApplicationBuilder app, IHostingEnvironment env)
        {
            if (env.IsDevelopment())
            {
                app.UseDeveloperExceptionPage();
            }
            else
            {
                app.UseExceptionHandler("/Home/Error");
                // The default HSTS value is 30 days. You may want to change this for production scenarios, see https://aka.ms/aspnetcore-hsts.
                app.UseHsts();
            }

            app.UseHttpsRedirection();
            app.UseStaticFiles();
            app.UseCookiePolicy();

            app.UseMvc(routes =>
            {
                routes.MapRoute(
                    name: "default",
                    template: "{controller=Home}/{action=Index}/{id?}");
            });
        }
    }
}

Since we're just building a simple demonstration web site, we dont need to make any changes to the code in Program.cs or Startup.cs.

Within the convert folder, we have Controllers, Models, and Views subfolders. These are all conceptually familiar to anyone familiar with the Model-View-Controller pattern. Controllers contains C# controller classes; Models contains C# model classes; and Views contain Razor pages (which are HTML with embedded C# code and Razor directives).

There's also a wwwroot folder, which contains static css, image, and JavaScript files.

Project Starting Point

We can build and run the project to see what we have been given out-of-the-box. In Visual Studio Code, open a new terminal window with Terminal > New Terminal. Run dotnew build to build the prjoect.

In traditional ASP.NET, launching the site locally from Visual Studio would use IIS or IIS Express to host the web site. In ASP.NET Core, all we need is the dotnet run command. Enter dotnet run in the terminal window to host a web server. Click the displayed HTTP or HTTPS link to open the site in a browser. We can see we get a simple Welcome page.


Code the HTML Page

We need to change the HTML in the default page, /Views/Home/index.cshml. We add the following code to the page:
@{
    ViewData["Title"] = "Home Page";
}

<div class="text-center">
    <h1 class="display-4">Unit Converter</h1>
    <p>Use this page to convert between common units of measurement</a>.</p>
</div>

<div> </div>

<div>
    <input id="source-value" type="number" value="10" style="font-size: 14px" />
        
    <select id="source-unit">
        <option value="">-- select source units --</option>
        <option value="ft" selected>Feet (ft)</option>
        <option value="km" selected>Kilometers (km)</option>
        <option value="m">Meters (m)</option>
        <option value="mi">Miles (mi)</option>
    </select> 
        
    <button id="btn-convert" onclick="convert();">Convert</button> 
        
    <input id="dest-value" type="number" value="" style="font-size: 14px" readonly=readonly />
        
    <select id="dest-unit">
        <option value="">-- select destination units --</option>
        <option value="ft" selected>Feet (ft)</option>
        <option value="km">Kilometers (km)</option>
        <option value="m">Meters (m)</option>
        <option value="mi" selected>Miles (mi)</option>
    </select>
</div>


<script>
function convert() {
    var value = $('#source-value').val();
    var sourceUnits = $('#source-unit').val();
    var destUnits = $('#dest-unit').val();

    $('#dest-value').val('');

    if (sourceUnits==='' || destUnits==='') return;

    if (sourceUnits===destUnits)
    {
        $('#dest-value').val(value);
        return;
    }

    console.log(value);
    console.log(sourceUnits);
    console.log(destUnits);

    var url = '/home/Convert?value=' + value + '&source=' + sourceUnits + '&dest=' + destUnits;

    $.ajax({
        url: url,
        method: 'GET',
    }).done(function(data) {
        $('#dest-value').val(data);
        //$( this ).addClass( "done" );
        console.log(data);
    });
}

</script>
We can now build the site with dotnet build and run it with dotnet run so that we can test it.

dotnet build
dotnet run

Now we can enter an amount and select source and destination units. Clicking Convert converts the value.


Our site, while simple, could easily be expanded to support many more conversions over time. For our purposes of testing cross-platform compatibility, this is sufficient and we can move on to seeing things work on Linux.

Publishing to Linux

We can generate output for linux with the dotnet publish command, specifying the distribution we wish to target. We'll use Ubuntu 18.04, 64-bit (because that's an AMI available for AWS EC2).

dotnet publish -c Release --self-contained -r ubuntu.18.04-x64

To deploy, we'll need to allocate a Linux web server, for which we'll use NGINX. We'll then deploy our convert site, and finally configure NGINX to serve as a reverse proxy to our ASP.NET Core site.

1. Create EC2 instance

We first create an Ubuntu EC2 instance on AWS. We save the .pem (key) file created with the instance, which will be needed anytime we want to connect to the instance with SSH.

Configure an inbound rule allowing port 80 in the security group for the EC2 instance.

As we allocate the EC2 instance, we save the .pem (key) file, which we'll need for subsequent steps.


2. Connect with SSH

Once the instance is up and running, we connect to it with SSH, specifying our instance URL and the .pem (key) file we created with the instance:

ssh -i "dp-dev.pem" ubuntu@ec2-my-ip.us-west-2.compute.amazonaws.com

3. Set up web server

To set up a web server, we use the sudo ("SuperUser do") command to allow port 80 on the firewall.

sudo ufw allow 80/tcp

Next, we install nginx, a popular web server:

sudo apt-get install nginx
sudo service nginx start

Once installation completes, we are able to confirm that we can access the EC2 instance as a web server:


4. Deploy the .NET Core application

Via SSH, create a convert file under /home/ubuntu. Then use a tool such as WinSCP to copy the files from the Ubuntu publish folder to /home/ubuntu/convert:


5. Configure nginx to be a Reverse Proxy for Convert.dll

Following the Microsoft instructions here, we do the following to set up NGINX as a reverse proxy for the NET Core convert site. This simply means NGINX will forward requests to our application.

a. Stop the nginx site

sudo service nginx start

b. Change directory to /etc/nginx/sites-available and replace the file default with the content below (I used Notepad++ and WinSCP for this):

cd /etc/nginx/sites-available

server {
    listen        80;
    server_name   example.com *.example.com;
    location / {
        proxy_pass         http://localhost:5000;
        proxy_http_version 1.1;
        proxy_set_header   Upgrade $http_upgrade;
        proxy_set_header   Connection keep-alive;
        proxy_set_header   Host $host;
        proxy_cache_bypass $http_upgrade;
        proxy_set_header   X-Forwarded-For $proxy_add_x_forwarded_for;
        proxy_set_header   X-Forwarded-Proto $scheme;
    }
}

If you run into permission issues, try uploading your new default file to a path you have write access to, such as where you copied the convert application publish files to. Then, in cd /etc/nginx/sites-available, you can use sudo cp to copy the file:

cd /etc/nginx/sites-available
sudo cp /home/ubunto/convert/default .

c. Start the nginx service

sudo service nginx start

6. Start the Convert Site

From /home/ubuntu/convert, use the dotnet command to run convert.dll to start the Convert site

cd /home/ubuntu/convert dotnet convert.dll

7. Try to access the site in a browser:


Our ASP.NET Core Convert site is now running on Ubuntu Linux, with NGINX serving as a reverse proxy. If you've never worked with Linux as a web server before, getting to this step with a .NET web site is a great moment.


Conclusion

In this post I've shared what my first-time experience publishing an ASP.NET Core web site to Linux. There were plenty of unknowns working with an operating system I had little experience with, but with a little persistence I got there. .NET Core is well done, and ASP.NET Core is no exception. It's very empowering to realize how broader your .NET Skills can now reach with .NET Core.


25th Anniversary Cruise, Part 7: Pompeii

In this series of posts I'm describing the Mediterranean Cruise my wife Becky and I took in 2018 for our 25th anniversay, Here in Part 7 I'm covering our seventh stop, Pompeii.

Pompeii (★★★★)

Pompeii was marvelous. In terms of historical richness and the amount of things to see, Pompeii delivered more than any other stop on our trip. 

Pompeii was an ancient Roman city near Naples that was buried by lava in the AD 79 eruption of Mount Vesuvius. The result is a highly-preserved ancient city. It's also a complete city: you can walk it's streets, look into houses and public places and restaurants and so on. It's not possible to see it all in one day, but our excellent tour guide Jose took us to many of the highlights and gave us lots of good information throughout the day.

Pompeii is in pleasant surroundings with picturesque hillsides, trees, and flowers.


Our guide walked us past practice fields for the gladiators and an amphitheatre.


We then proceeded to walk the streets. The Pompeiians were pretty sophisticated. There were stone blocks to step on so upper-class citizens could avoid walking in garbage. There were shells embedded in the streets to provide reflective illumination at night.


"Your Money is Welcome Here"

Seeing Roman homes was impressive. Some homes had impressive floor tiles. Wall mosaics were common.


Public baths with hot and cold water; and a restaurant kitchen.


We also saw some of the casts made of bodies.


Inside this arch you can see Mount Vesuvius.


That's about all we had time for, but despite seeing a lot there's far more to Pompeii. We certainly felt Pompeii didn't disappoint.

Previous: Part 6: Rome


25th Anniversay Cruise, Part 6: Rome

In this series of posts I'm describing the Mediterranean Cruise my wife Becky and I took in 2018 for our 25th anniversay, Here in Part 6 I'm covering our sixth stop, Rome.

Rome (★★★★)

Like Florence, Rome is an ancient city full of wonders. Like Florence, you can't do Rome justice in a day (or even a week). But a day is better than not visiting at all. 

I will admit to some trepidation about visiting Rome; on my very first tour of Europe in 1981, I remember the tour guides talking to themselves: one remarked to the other that he would never do a tour in Rome again because of all the pickpocketing. In preparing for this trip, we were regularly warned against pickpocketing in Europe and especially Rome. We came prepared, with money belts and a watchful attitude. Happily there were no incidents here or anywhere else on our trip.

St. Peter's Basilica

We're not Catholic, so seeing St. Peter's Basilica wasn't of particular interest to usbut if we were going to see the Colosseum, this was part of the tour. It is a very large (holds 60,000) and ornate building, built in 1626. It is filled to the brim with art, gold, and homages to various popes. It been guarded for centuries by the Swiss Guard.


St. Peter's Basilica and Swiss Guard

Trevi Fountain

The Trevi Fountain dates back to ancient Rome and is one of the most famous fountains in the world. It is the terminal point of an aqueduct started in 19 B.C. The fountain underwent an overhaul in 1732 where it became more ornate and baroque. The palace behind the fountation is the Palazzo Poli.


Trevi Fountain

We enjoyed some gelato while taking in the fountain.


Roman Lunch

We had a group lunch at the Albergo Mediterraneo. It included bread, wine, pasta, veal, espresso, and dessert and was very good.


Lunch in Rome

Colosseum

Our next stop wa the Colosseum, one of the "must see" sights in Rome. Just past the Arch of Constantine and ruins of the Forum is the colosseum. The Colosseum is the a great oval amphitheatre whose walls are partly gone. According to Wikipedia it's the largest amphitheatre ever built and could hold 50,000-80,000 spectators.


The Colosseum

Our tour guide was talking fast and was hard-to-understand, unfortunately. After a few talks, we were left to explore on our own. Fortunately, I'd seen enough documentaries on the Colosseum to understand something of its design and history.

Catacombs

We next saw the catacombs, burial places for Christians used from the 2nd to 5th centuries. Unfortunately, photographs were not permitted. The catacombs are labyrinths of subterranean passages with niches for corpses. 


This place kind of gave me the creeps: there are many tight spaces that give rise to claustrophobia; and one could easily get lost here. It was however nice and cool in contrast to what had otherwise been a very hot day.

Back on the Ship

After a fascinating but also a very long day, we returned to the Crown Princess and had dinner in the main dining room. I enjoyed a Roast Beef, Yorkshire Pudding, and Gazpacho. I'd never had Gazpacho beore and I loved it. Becky had roast pork.


Eating Well in the Main Dining Room

Previous: Part 5: Florence
Next: Part 7: Pompeii


Saturday, April 20, 2019

25th Anniversary Cruise, Part 5: Florence

In this series of posts I'm describing the Mediterranean Cruise my wife Becky and I took in 2018 for our 25th anniversay, Here in Part 5 I'm covering our fifth stop, Florence.

Florence (★★★★)

Florence is famous for being the birthplace of the Renaissance, without which we'd all be leading significantly more mundane lives. Having to see Florence in a single day is a sin, but it's better than not seeing Florence at all. 

Our first view of Florence after jumping off the tour bus was exciting, and that feeling continued throughout the day. Every corner we turned had something significant to see, whether it was the natural beauty of Tuscany or a work of architecture.  


Walking through Florence

Uffizi Gallery

The Uffizi Gallery is one of the most important art museums in the world.  It is crammed full of a massive amount of art. We unfortunately had a short time here, and as our tour guide whisked us from one room to the next I knew that for each masterpiece we were shown there were 100 we had to skip past. It also didn't help that every single person in there was trying to take pictures at the same time. It is nicely arranged so that you can see the progression of art styles over time.


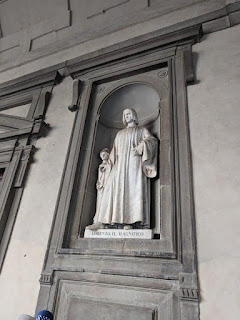
Statue of Lorenzo the Magnificent, Patron of Renaissance Culture

If I ever have the opportunity to return to Florence, I'd want to spend a lot more time here. Even as we were being whisked own corridors, I realized that even the ceiling above our heads were covered in artwork

Serious Art

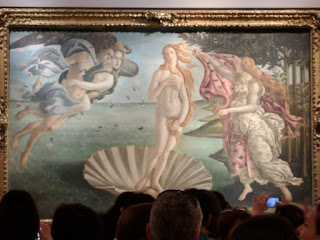
Some of the key works in the Uffizi Gallery are from Botticelli, Da Vinci, Michelangelo, and Rafael. In particular I remember The Birth of Venus by Botticelli.

The Birth of Venus

The best city shot of Florence I got was actually looking out the window from one of the floors of the Uffizi gallery: 

Piazza della Signoria

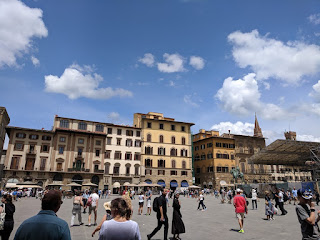
The Uffizi Gallery is adjacent to the Piazza della Signoria, the historic center of Florence. This was a marvelous place to look about and take in the essence of Florence. We enjoyed espresso there.


Piazza della Signoria

Lunch

Once again a chance to eat Italian food in Italy! Our tour included lunch as a group at Osteria dei Baroncelli, right around the corner from the Uffizi Gallery. The restuarant had an ornate interior, fitting for its location. Lunch included bread, wine, a pasta starter (enthusiastically served family style from the largest serving bowl I have ever seen), veal, salad, and Tiramisu. 


A Delicious Italian Lunch

Walk Across Florence

The other art gallery on our itinerary was the Accademia, where Michalangelo's David is housed—but that's quite some distance away. We walked across Florence for what felt like miles; inspiring sights to see, but also hot and tiring.


The Long March across Florence

On the way, we saw the Duomo from the outside. The dome is a familiar symbol of Florence, but I hadn't realized the dome was part of a much larger structure, a majestic cathedral building.


Duomo

We also saw the Florence Baptistery, with bronze doors by Lorenzo Ghiberti containing detailed Old Testament scultures. Michelango called them "The Gates of Paradise."


The Gates of Paradise

Accademia

Finally we made it to the other art gallery, the Accademia. This gallery contains major works from Michelangelo included his statue David. The status was originally in the Piazza della Signoria where a replicate still stands, but the original was moved to the gallery in order to protect it.


Art by Michelango

The biggest draw in the gallery is of course the David statue. An awful lot of people were perpetually surrounding the statue, including art students.


David

Florence was a wonderful place to visit, and we give it 4 stars. We really wished we had more time there.