Showing posts with label Adventure. Show all posts

Tuesday, May 7, 2019

Romans Ruins Adventure, Part 3: Twitch Minigame

In this series of posts I'm sharing my experiences creating an old-style text Adventure game, adapted somewhat for the 21st century. In Part 1 I reviewed the history of Adventure games and the game design for my version, Roman Ruins Adventure. In Part 2, I covered an Alexa Skill implementation of Roman Ruins Adventure. Here in Part 3 I'm covering a Twitch Minigame Extension implementation.

For those unfamiliar with Twitch, it's the world's largest video live streaming platform for the gaming community. Tens of millions of people around the world watch gamers play and chat about it; this is called esports.


Twitch Extensions: The Basics

Anyway, back to Twitch Extensions. If you've joined Twitch, you're either a broadcaster or a potential broadcaster, and you have a channel page from which people can access your live stream or videos. You can customize your channel page with additional elements, including Twitch Extensions. One use for Twitch Extensions are mini-games, and that's what I'm building here.

I'm brand-new to writing Twitch extensions, so this was an exercise in getting familiar with their structure and methodology. There are several kinds of extensions. For our game, we'll be making a panel extension, which will appear below the video player on a broadcaster's channel page.

To help developers get started, Twitch has assets you can download including a Developer Rig (for locally testing your extension) as well as a Hello World sample. I'm doing this work in Visual Studio Code on Windows, but you can also develop Twitch extensions on MacOS or Linux.

The Hello World sample has a two-fold structure: there is a front-end portion and a back-end portion. The front-end is just good old HTML, CSS, and JavaScript/TypeScript. That's what's going to render the panel UI. The back-end is a service that can handle POST requests. The Hello World extension simply puts a colored circle on the screen that you can change by clicking. In getting familiar with how extensions work I added to this starter code to make a simple color matching game. Here's what it looks like running in the Twitch Developer Rig:

Testing an Extension in the Twitch Developer Rig

Once an extension is developed, there are other steps to follow before it can become available on Twitch. It proceeds from Local Test to Hosted Test, where the developer can privately try it out on Twitch. It then gets submitted for approval. More on that process later. Armed with confidence from this initial exercise, it was time to make an extension for Roman Ruins Adventure.

Roman Ruins Adventure as an Extension

With tbe basic gameplay JavaScript code already in place (as described in Parts 1 and 2), this involved three activities:

1. Injecting the JavaScript game code into the extension project structure.
2. Adapting the user interface for the Twitch environment.
3. Making changes to satisfy the requirments for Twitch Extensions.

Injecting the Game Code

Adding the JavaScript game code was fairly easy. The place for that in the extension project structure is the front-end code. The front-end code as provided in the Hello World project has a pretty simple structure, with these notable files:

  • panel.html is the page that renders the extension panel, with a max display are size of 318 x 496 pixels.
  • viewer.js is supporting code for panel.html.
  • config.html is a configuration page for configuring the extension, if applicable.
  • config.js is supporting code for config.html.
  • helper.js contains helper functions.


For my game, I would be adding game play code to viewer.js. I decided to put the game data code into a separate file, gamedata.js, due to its size. I also added jQuery and a tooltip library.

User Interface

My initial thoughts on a user interface were to keep things simple: after all, this project is about giving new life to old-style textual Adventure games in modern computing interfaces. For the Alexa voice skill described in Part 2, this was a slam dunk (although there was a visual element to consider for some Alexa devices).

My first implementation had a command bar at bottom for entering commands like LOOK or TAKE BOTTLE, and the rest of the panel was reserved for the game's text narrative. But it looked very plain.

In prototyping my mini-game as text-only display with text input, I couldn't get away from the feeling that this was going to be a non-starter with much of the Twitch audience. Would a young audience have the patience for entering text commands and reading through narratives, or would it be in everybody's best interest to provide some refinements?

After playing around with some different ideas, I decided to first off make use of the pictures of Pompeii I'd taken last year, by making the panel background an image of the current room. This certainly added atmosphere and complemented the textual descriptions (a picture is worth 1000 words after all).

With Image Added for Current Room

The second improvement I made is toolbar buttons as an alternative to text commands. The command bar remains, but you can now click toolbar buttons with icons for common commands like LOOK, INVENTORY-TAKE-DROP, and directional movements. As you click these buttons, the command being executed is shown in the command bar. Toolbar buttons result in much faster navigation, which might make all the difference to a player with a short attention span. In addition, the directional toolbar button are enabled/disabled to show in which directions movement is possible. This again can make the game much quicker to figure out and complete, but I think it's an acceptable compromise in usability for the target audience. It is a mini-game after all.

With Toolbar Added for Common Commands

Inventory-Take-Drop Toolbar Action

The third usability improvement is in the narrative text itself. I've added hyperlinks to prompt the user about common commands they might want to take. That means, for example, coming to the Gladiator Field a player can just click a bone in the narrative, instead of typing EXAMINE BONE in the command bar. Likewise, from the Examine Bone text they can click take bone instead of typing TAKE BONE in the command bar.


With Links in Narrative Text

All of these changes streamline game play, perhaps to the point where the game world needs to be made significantly larger in order to remain engaging. I'll be working on that. For those who feel this foreshortens the traditional Adventure experience, you can always play the Alexa version.

Getting Things Working Locally

With some UI decisions made and the basic gameplay code added, it wasn't too much work to get this extension working locally. In viewer.js, click events were added to connect UI elements such as the toolbar buttons to game code functions.
// Initialization - runs immediately after loading

$(function () {
  // when we click the cycle button
  $('#execute').click(function () {
    if(!token) { return twitch.rig.log('Not authorized'); }
      execute();
    });
  $('#command').focus(function() {
      $('#command').val('');
  });
  $('#command').keyup(function(event) {
      if (event.which == 13 || event.keyCode == 13) {
        execute();
        return false;
    }
    return true;
  });
  $('#btn-actions').click(function() {
    if (gameOver) return;
    actions();
  });
  $('#btn-inventory').click(function() {
    if (gameOver) return;
    $('#command').val('INVENTORY');
    execute();
  });
  $('#btn-west').click(function() {
    if (gameOver) return;
    $('#command').val('WEST');
    execute();
  });
  $('#btn-east').click(function() {
    if (gameOver) return;
    $('#command').val('EAST');
    execute();
  });
  $('#btn-north').click(function() {
    if (gameOver) return;
    $('#command').val('NORTH');
    execute();
  });
  $('#btn-south').click(function() {
    if (gameOver) return;
    $('#command').val('SOUTH');
    execute();
  });
  $('#btn-up').click(function() {
    if (gameOver) return;
    $('#command').val('UP');
    execute();
  });
  $('#btn-down').click(function() {
    if (gameOver) return;
    $('#command').val('DOWN');
    execute();
  });
  $('#btn-examine').click(function() {
    if (gameOver) return;
    $('#command').val('LOOK');
    execute();
  });
  $('#btn-help').click(function() {
    if (gameOver) return;
    $('#command').val('HELP');
    execute();
  });
  newGame();
});
A departure from the implementation for Alexa is that the dynamic output being generated is HTML, not text sentences. Sometimes that HTML is just text, but often it has embedded elements such as clickable links (SPAN elements) and line breaks (BR elements).

Here's a part of the game code that executes the EXAMINE object command. If no recognizable object was referenced, the response is Please identify the object to examine. If we have a known object, objects[object] is the object definition and we can output its name property as a title and its examine property as a description. A link is then added to TAKE the object (or DROP it, if we're already carrying it). The object's carrying flag tells us if we're carrying the object or not.
// Examine an object.
// Inputs: object : object ID (integer)
// Outputs: command result display to #output

function examine(object) {
  if (object===null) {
    $('#output').text('Please identify the object to examine.');
    return;
  }
  $('#command').val('EXAMINE ' + objects[object].name.toUpperCase());
  var html = '' + objects[object].name + '
' + objects[object].examine + '

';
  if (objects[object].carrying)
    html += 'Drop ' + objects[object].name + '';
  else
    html += 'Take ' + objects[object].name + '';
  $('#output').html(html);
}
examine function

Once I could fully play the game locally and completed general debugging, I was ready for the next step: hosted testing on Twitch.

Hosted Testing

My first time through the extension process, I struggled a bit uploading the project. You create a zip file and upload it via the Twitch developer console. Each time I tried this the upload failed, but there weren't any details about why it failed. After ruling out any issues with the zipping itself, I eventually realized I wasn't supposed to upload the entire project, only the front-end files. I presume that if you do have a back-end, you must find your own hosting for this, such as an AWS Lambda function.

Once your files are uploaded, you can tell the developer console to switch your extension from Local Test mode to Hosted Test mode. Now, from your own channel page the extension appears below the video player and you can test it there.

Since I'd tested fairly extensively with the local Developer Rig, I expected the hosted test to go pretty quickly, but I was in for some surprises. Browsing to my channel on twitch.tv, I activated my panal extension and started playing Roman Ruins Adventure. My game started out okay, but almost immediately it got to a non-working state and would not respond to interactions.

It turns out there are some requirements extensions need to meet that aren't caught by the Developer Rig. The F12 browser console confirmed there was unhappiness, and most of it was due to Content Security Policy.

If you aren't familiar with Content Security Policy, it's a standard intended to prevent a variety of attacks including cross-site scripting and clickjacking. It works like this: if the web server includes a Content-Security-Policy header in its responses, then a CSP-compliant client (like your browser) will enforce its regulations. Anything Twitch-hosted will send the Content-Security-Policy header, so any extensions you write for Twitch need to conform.

Well. I wish the Twitch Developer Rig had alerted me to all of that during local test, but it didn't. Now that I was aware, it was time to refactor the code. One change I had to make was making my JavaScript library references use local files. That was easy enough.

What else was CSP unhappy with? Primarily, it was the inline onclick="function(...)" attributes on the dynamically-generated HTML responses to commands. The biggest challenge here was the dynamic HTML the game functions generated, which often contained embedded links in the form of SPAN elements with onclick attributes. Somehow I needed to retain embedded links in my HTML without resorting to onclick attributes.

After thinking about this for a bit, what I settled on was a click handler for #output, the div that holds the entire output for a command. The click handler can be set in the initialization code in viewer.js:
// Initialization - runs immediately after loading

$(function () {
...
  $('#output').click(function(e) {
    outputClick(e);
  });
  newGame();
});
The click handler itself, outputClick, works as follows. When it responds, it determines the specific element that was clicked: that could be #output, but it could also be something within that element, such as a SPAN element. It's the SPAN elements we're interested in, because they represent clickable links. But we're not permitted to use onclick attributes, so how to know what command to associate with a SPAN? What I ended up doing is inventing a custom HTML attribute for my SPANs called command. When the click handler determines a SPAN element was clicked, it checks for a command attribute, which holds the command it needs to execute.
// Click handler for the output text, which may contain dynamically embedded links.
// If an item was clicked that contains a command="..." attribute, that command is executed.

function outputClick(e) {
  if (e) {
    var target = e.target;
    if (target) {
      var id = target.id;
      var command = $(target).attr('command');
      if (command) {
        if (command==="RESTART") {
          newGame();
          startGame();
        }
        else
          cmd(command);
      }
    }
  }
}
It took a little bit of time to come to this design, but once I did I felt good about it. The code remains simple and understandable, and the extension now works on Twitch in Hosted Test mode. Earlier we looked at some game code, the examine() function. Here's the revised version that is CSP-compliant:
// Examine an object.
// Inputs: object : object ID (integer)
// Outputs: command result display to #output

function examine(object) {
  if (object===null) {
    $('#output').text('Please identify the object to examine.');
    return;
  }
  $('#command').val('EXAMINE ' + objects[object].name.toUpperCase());
  var html = '' + objects[object].name + '
' + objects[object].examine + '

';
  if (objects[object].carrying)
    html += 'Drop ' + objects[object].name + '';
  else
    html += 'Take ' + objects[object].name + '';
  $('#output').html(html);
}
examine function (revised for CSP)

With these changes uploaded, Roman Ruins Adventure now works in Hosted Test mode. Yippee!

Extension on Twitch

Approval

All I had to do next was submit Roman Ruins Adventure for approval. There was a form to fill out, screenshots and icons to provide. After a few days' wait, I was approved. Now anyone who is retro-game minded (there are some of us, Retro Gaming is an entire category on Twitch) can partake.

Roman Ruins Adventure Extension Description on Twitch

If you're a Twitch user, feel free to add Roman Ruins Adventure to your channel as a mini-game panel and give it a whirl. I'd be happy to hear your feedback.

Previous: Part 2: Alexa Skill

Monday, May 6, 2019

Roman Ruins Adventure, Part 2: Alexa Skill

In this series of posts I'm sharing my experiences creating an old-style text Adventure game, adapted somewhat for the 21st century. In Part 1 I reviewed the history of Adventure games and the game design for my version, Roman Ruins Adventure. Here in Part 2 I'm covering an Alexa Skill implementation of Roman Ruins Adventure.


I've already covered the basic game design, game data representation, and game code in JavaScript. Now we'll look at what it takes to implement the game as an Alexa Skill, a voice-driven app. Since classic Adventure games are textual in nature, it's a perfect fit for a voice assistant.

Alexa Skills Project

Alexa Skills are defined in the Amazon Developer Console.

Alexa Skill Project

Our project has these intents defined:
  • north, east, west, south, up, down : movement commands
  • look : examine surroundings
  • examine object : examine an object
  • take object : take an object
  • drop object : drop an object
  • give object : give an object
  • help : explain available commands
  • mission : restate the mission
  • restart : restart a new game
Each intent includes a set of utterances, which gives us a change to provide a range of possible words and wordings. For utterances that reference an object, such as take shown below, the object is defined as a slot named object. Elsewhere under slots we defined the possible value for object that might be spoken, such as "bone" or "bottle".

Take Intent

The Alexa Skill project will recognize intents out of what a user speaks and categorize parts of that speech as objects. The gameplay itself however needs to be in our back end.

Lambda Node Project

The back end for our skill is a serverless function, an AWS Lambda function. Lambda functions can be written in a variety of languages. We're usinde node.js, because it fits the decision in Part 1 to write the game code in TypeScript/JavaScript.

Variables

At the top of our code are our variables, in an object named session. These include the current command and resulting output; the current room; a game over flag; the number of items being carried; an image URL for the current room; and lastly our arrays of rooms and objects. Those arrays get populated when the game initializes.

Lambda functions don't inherently preserve state, so we will be passing this object to and from Alexa between invocations in order to preserve our game state.
var session =
{
    command: '',
    output: '',
    room: 0,
    location: null,
    gameOver: true,
    itemsCarried: 0,
    it: null,
    imageUrl: image("0.jpg"),
    objects: [],
    rooms: []
}

Boilerplate Functions

In a node.js Lambda function for an Alexa Skill, a number of boilerplate functions are used to interact with Alexa. I'm using ones that came with one of the quickstarts, ColorPicker.
  • onSessionStart fires when a new session is created. 
  • onLaunch fires when the skill has been opened.
  • Exports.handler routes incoming requests based on type.  
  • onIntent is called by Exports.handler to process an intent.
Let's look at one of those functions, onIntent. This dispatches each receieved intent from Alexa to an appropriate handler function.
/**
 * Called when the user specifies an intent for this skill.
 */
function onIntent(intentRequest, session, callback) {
    console.log(`onIntent requestId=${intentRequest.requestId}, sessionId=${session.sessionId}`);

    const intent = intentRequest.intent;
    const intentName = intentRequest.intent.name;

    // Dispatch to your skill's intent handlers
    if (intentName === 'help') perform("HELP", intent, session, callback);
    else if (intentName === 'mission') perform("MISSION", intent, session, callback);
    else if (intentName === 'actions') perform("ACTIONS", intent, session, callback);
    else if (intentName === 'look') perform("LOOK", intent, session, callback);
    else if (intentName === 'examine') performObject("EXAMINE", intent, session, callback);
    else if (intentName === 'take') performObject("TAKE", intent, session, callback);
    else if (intentName === 'drop') performObject("DROP", intent, session, callback);
    else if (intentName === 'use') performObject("USE", intent, session, callback);
    else if (intentName === 'inventory') perform("INVENTORY", intent, session, callback);
    else if (intentName === 'north') perform("NORTH", intent, session, callback);
    else if (intentName === 'east') perform("EAST", intent, session, callback);
    else if (intentName === 'west') perform("WEST", intent, session, callback);
    else if (intentName === 'south') perform("SOUTH", intent, session, callback);
    else if (intentName === 'up') perform("UP", intent, session, callback);
    else if (intentName === 'down') perform("DOWN", intent, session, callback);
    else if (intentName === 'look') perform("LOOK", intent, session, callback);
    else if (intentName === 'repeat') performRepeat(intent, session, callback);
    else if (intentName === 'restart') perform("RESTART", intent, session, callback);
    
    else if (intentName === 'AMAZON.HelpIntent') {
        getWelcomeResponse(callback);
    } else if (intentName === 'AMAZON.StopIntent' || intentName === 'AMAZON.CancelIntent') {
        handleSessionEndRequest(callback);
    } else {
        throw new Error('Invalid intent');
    }
}

Command Functions

The perform function is called for simple commands that don't reference any objects, such as NORTH or LOOK. A command can be determined from the intent name, and is executed with the game function cmd(...).
// Perform a one-word command - ex: LOOK

function perform(command, intent, alexaSession, callback) {
    const repromptText = "Tell me a command, or say HELP for a list of commands.";
    let shouldEndSession = false;
    let speechOutput = '';
    
    if (alexaSession.attributes)
      session = alexaSession.attributes;

    speechOutput = cmd(command) + suffix();

    callback(session,
         buildSpeechletResponse(session.command.toUpperCase(), speechOutput, repromptText, shouldEndSession));
}
The performObject function is similar, but expects an object to passed along with the intent for commands such as TAKE BOTTLE or EXAMINE BONE. The command is the intent name, a space, and the object name, which is passed as a skill slot value.
// Perform a command that references an object - ex: EXAMINE BONE

function performObject(command, intent, alexaSession, callback) {
    const repromptText = "Tell me a command, or say HELP for a list of commands.";
    let shouldEndSession = false;
    let speechOutput = '';
    
    if (alexaSession.attributes)
      session = alexaSession.attributes;
        
    command += " " + intent.slots.object.value;

    speechOutput = cmd(command) + suffix();

    callback(session,
         buildSpeechletResponse(session.command.toUpperCase(), speechOutput, repromptText, shouldEndSession));
}
Both perform and performObject must extract the saved session variables from alexaSession.attributes in order to know the game state. Both must pass session back to buildSpeechletResponse so that the updated game state is preserved.

buildSpeechletResponse

The buildSpeechetResponse function builds the speech output. Functions like perform and performObject pass output containing the text we want to speek. buildSpeechletResponse creates the JSON that causes that text to be spoken.
// --------------- Helpers that build all of the responses -----------------------

function buildSpeechletResponse(title, output, repromptText, shouldEndSession) {
    
    var outputSpeech = null;
    
    var cardText = replace(output, '', '\r\n\r\n');

    if (output.indexOf('<') != -1) {
        outputSpeech = {   // output contains markup (audio, breaks) - output SSML
            type: 'SSML',
            ssml: '' + output + '',
        };   
    }
    else {
        outputSpeech = {  // output is just text
            type: 'PlainText',
            text: output
        };
    }

    return {
        outputSpeech: outputSpeech,
        card: {
            type: 'Standard',
            title: `${title}`,
            text: cardText,
            content: `SessionSpeechlet - ${output}`,
            image: {
                "smallImageUrl": session.imageUrl,
                "largeImageUrl": session.imageUrl
            }
        },
        reprompt: {
            outputSpeech: {
                type: 'PlainText',
                text: repromptText,
            },
        },
        shouldEndSession,
    };
}
In the case of Alexa devices that can display cards (visuals), output is also created that includes a title of the spoken command, and an image to go with the current room. Those images are my photos of Pompeii, hosted in S3. Here's what the display looks like:

Card Display

And that's it. The rest of the code is game data and game code, which I've described somewhat in Part 1. I'm not going to post the full code just yet since that would give away secrets of the game.

I've created other Alexa skills, so the skills creation went pretty rapidly. One odd thing I ran into is that Alexa doesn't seem to recognize the term "statue" even though it's in the list of objects I defined for the skill. I had to code around this for now pending further study. Aside from that, I didn't run into any problems. If your skill wants to remain open pending further input, which this game does, you are required to prompt the user with each spoken response. That's why Roman Ruins is constantly asking "What next?" after it tells you something. It wouldn't pass certification otherwise.

I submitted the Roman Ruins skill over the weekend and it was approved this morning. Here's how the listing looks on Amazon.com:


Playing Roman Ruins Adventure on Alexa

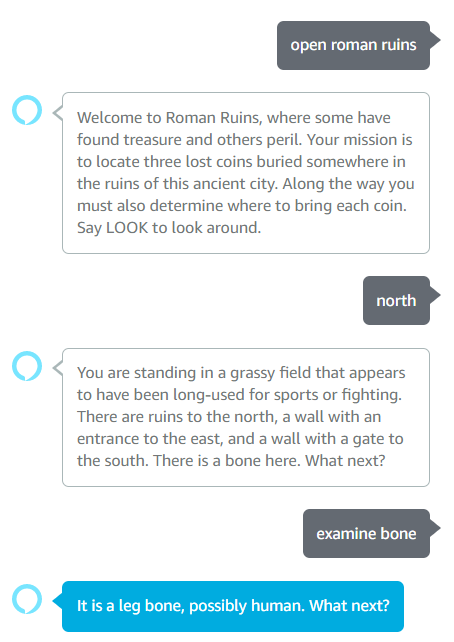
So, what's it like to play this on Alexa? Below is an excerpt. It works pretty well, but you can always do more to handle a wider range of responsesand you particularly feel that when you're working on voice applications.

Playing Roman Ruins Adventure on Alexa

Feel free to play! Try "Alexa, open Roman Ruins" and let me know what you think. As I extend and polish the game my goal is to make better and better. Your feedback will help a great deal.

Previous: Part 1: Nostalgia and Game Design
Next: Part 3: Twitch Minigame


Roman Ruins Adventure, Part 1: Nostalgia and Game Design

In this series of posts I'll share my experiences creating an old-style text Adventure game, adapted somewhat for the 21st century. Here in Part 1, I'll review the original Adventure and why it was such a ground-breaking development. Then I'll go over the design of my own game, called Roman Ruins adventure.

In subsequent posts I'll show how this game is implemented for Alexa as a voice skill, and for Twitch as a mini-game extension.

Adventure, the First Interactive Fiction

As I recently blogged, I love games—but mostly retro games. In high school—before personal computers—we were fortunate indeed that Suffolk County owned a DEC PDP10 timesharing machine and allowed schools in the county to connect to it via teletypewriters over modems. Thus, my first computer experience was this:


No screen, just teletype output on a paper roll. We didn't even have lower-case letters. All pouring out at the dismally slow speed of 110 baud. I'm sure this seems extremely limiting to anyone who is not a baby boomer, but as it was my first computing experience I was all over it. I got my foundation in computing basics this way (and it was far superior to college, where they were still having us punch cards!).

ADVENT, or Colossal Cave Adventure, was a game that had been developed by Will Crowther and Don Woods for the PDP-10. It had become popular among PDP10 installations and was making the rounds; not on the Internet, but via its predecessor, the ARPANET which had a much more limited audience.

Adventure was different from other computer-based games of the time: it described a world and you the player had to explore it. You decided what to do, and your actions had consequences. Will Crowther had based his Colossal Cave Adventure on actual cave exploration he had participated in. As this "book" unfolded, you the player made decisions that changed the narrative. That's why this is considered the first example of interactive fiction.

Adventure was one of those "a minute to learn, a lifetime to master" kind of games. You enter text commands, and an English language description told you where you were and what was going on:

You are standing at the end of a road before a small brick
building.  Around you is a forest.  A small stream flows out
of the building and down a gully.

You typed one or two-word commands to Adventure. For example, you could move around with NORTH, EAST, WEST, SOUTH, UP, and DOWN. There were only a handful of commands to learn.

> EAST

You are inside a building, a well house for a large spring.
There are some keys on the ground here.
There is a shiny brass lamp nearby.
There is tasty food here.
There is a bottle of water here.

Some "rooms" of the adventure contained objects. You could GET or TAKE an object, which would then come along with you as moved to different rooms. You could likewise DROP an object, leaving it in your current room. You could use INVENTORY to get a list of what you were currently carrying.

> TAKE LAMP

Ok.

> TAKE FOOD

Ok.

> INVENTORY

You are currently holding the following:
Brass lantern
Tasty food

Some objects were essential: carrying a lamp might allow you to see in a dark place. Some areas of the game were tough to navigate. Adventure is famous for having ten rooms with an identical description. Upon closer examination, each room has a slightly different description and a careful player can make a map to get through the area. Once that's done, navigation is simple. Another technique is to leave an object in each room.

You are in a little maze of twisty passages, all alike.

As you played the game, you also discovered puzzles to solve and adversaries to deal with. For example, dwarves are troublesome and can kill you or prevent you from moving past them. A novice player might remember encountering food and be tempted to offer it to the dwarf—only to learn something important about dwarves:

> GIVE FOOD
You fool, Dwarves eat only coal! Now you've made him *REALLY* MAD!!

In this manner, by exploring and experimenting, the player learned what was where and what the rules of the road were. There was an artistry in the way places were described: paying attention to descriptions often paid off. Humor and the unexpected were to be found as well.

The limited computer interfaces available at the time didn't hamper Adventure at all, because all the magic happened in your imagination, just like a book.

Adventure Game Derivatives

Adventure Games were a big deal in the 1980s. Several companies produced Adventure games commerically. I remember my brother Lee spending a lot of time with the ZORK games from InfoCom.

Zork III: The Dungeon Master

As the years progressed, there was less interest in the textual Adventure games. Home computers and home game consoles were getting powerful and computer interfaces more sophisticated. The focus was on graphics, color, and sound.

The idea of Adventure Games, though, never stopped being relevant. Many, many games today include similar elements of exploration. For example, the Adventure-style commands are quite apparent in Indiana Jones and the Fate of Atlantis (1992):

Indiana Jones and the Fate of Atlantis

On the original XBOX, I enjoyed Indiana Jones and the Emperor's Tomb (2003). The graphics were sophisticated, the action was controlled with a game controller, and there was a lot of action movement and fighting along the way. But still present were those original ideas from Adventure: a world to explore made up of different rooms; objects to take and use at the appropriate moment; puzzles to solve; and treasure to find.

Indiana Jones and the Emperor's Tomb

I've never played Dungeons and Dragons myself, but I'm aware that many games today have combined elements of that as well as Adventure. That often means a painstaking amount of detail goes into every aspect of the game. Take a look at how detailed the inventory is in Elder Scrolls V: Skyrim.

Skyrim

Adventure in Modern Times

Adventure in its original form may be little-known to younger people, but it hasn't been forgotten. There's a documentary on the history of interactive fiction games called Get Lamp on YouTube by Jason Scott.

You can still play the original adventure today. The AMC Halt and Catch Fire site has an area where you can play the original ADVENT on the web.


You can even play ADVENT via SMS by texting this number: +1 (669) 238-3683.

Believe it or not, the original textual game format still has a loyal following. There's even new game development going on, such as 2018's Alias "The Magpie". Adventure has left quite a legacy.

Alias 'The Magpie' being played on Twitch

My Adventure: Roman Ruins

Given all these fond memories, I decided recently that it was high time I created an Adventure game of my own. I thought to start with something very similar to the original Adventure, then find places where that kind of textual interface made sense in modern times. One idea that occurred to me is the popularity of voice assistants such as Amazon's Alexa: the original Adventure game format fits that mode of communication perfectly. Adventure would also make a nice mini-game, for example a Twitch Extension.

I gave myself one week in which to design a game, implement it for both Alexa and Twitch, and submit them for approval (a second reason I'm doing this is to get experience writing Twitch Extensions). Happily both were approved this morning, which is why I'm starting to blog about them. That being said, I'll readily admit a lot more could be done to extend the game and polish the implementation.

Roman Ruins on Alexa 

Roman Ruins Adventure mini-game on Twitch

Game Design

I decided I would write my game in TypeScript (which transpiles to JavaScript). JavaScript can be run in a huge number of places today, including web browsers and Node.js. But before implementing anything specific I would need to design the game itself.

The program code of a textual Adventure game doesn't tend to be very large or complex: when these games were first created, available memory was limited. Minimally, for data you need an array of rooms, an array of objects, and a handful of variables to keep track of your current room and the state of game puzzles (obstacles and adversaries). Commands are simple phrases such as NORTH, LOOK, INVENTORY, TAKE LAMP, EXAMINE BOTTLE, or GIVE FOOD.

Where the real work lies is in the game data. You've got to come up with a world and describe it well with interesting writing. You've got to decide what rooms there are, what directional connections there are between them, and what objects are placed where. You've go to come up with an objective, and there need to be puzzles to solve in order to get to that objective. You've got to craft a narrative that is helpful but not too helpful. Lastly, humor and learning-along-the-way is a hallmark of Adventure games.

For the setting for my Adventure game, I reflected on a cruise tour of Europe my wife Becky and I took last year for our 25th anniversary. We were particularly impressed with the well-preserved city of Pompeii. I decided I would make my world the ruins of an ancient Roman city, using what we had seen of Pompeii as a model. Plus, I had pictures of Pompeii which might be useful in some game interfaces.

The first thing I needed was a room map, describing the rooms (places) and how one can move from one room to another. Without giving away too much about the game, below is a partial look at my initial map of ground level. The player would start at the South Gate. By paying attention to descriptions and experimentation, he or she would soon learn they could go north to get to a gladiator's field; then east to reach an amphitheatre; and then north to get to a main road. The main road could potentiall leads to a nunber of interesting areas, such as a Roman house or a temple or a public baths. The player might or might not have noticed a statue to the north of the gladiator field, which might or might not become important later on.


Partial Room Map - Ground Level

Just as Will Crowther used his actual experience exploring caves to guide his world design in Colossal Cave Adventure, I am doing the same by using my visit to Pompeii. The above rooms depict actual places I visited. To be sure, I am not doing a full scale model of the city of Pompeii: it's enormous, and I didn't get to see all of it. Rather, I'm taking the places I did visit and interconnecting them in a similar but simplified way. Using real places allows me to furnish compelling descriptions.


Pompeii, the Inspiration for Roman Ruins

My game would need a mission, some objective. I decided to place three coins somewhere in the city: the player would need to locate a bronze coin, a silver coin, and a gold coin; each progressively harder to locate. Then, the player would need to figure out where to bring each of these coins based on examination and clues they would find along the way.

Game Data

The JavaScript data storage for my rooms (partial) looks like this. First, there are constants for each room which is useful in specific game play code. Next is the array of rooms itself. Each is a JavaScript object with properties for
// Room IDs

const SOUTH_GATE = 0;   // Nocera Gate (South Gate)
const PALAESTRA = 1;    // Gladiator practice field
const AMPHITHEATRE = 2; // Amphitheatre
const DECUMANUS_EAST = 3;     // Decumanus Maximus - east

...

// Room detail

  session.rooms = [ 
    { name: "South Gate", // 0 SOUTH_GATE
      visited: true,
      arrival: null,
      look: "You are standing outside an ancient wall. The ground is covered in white ash. To the north is a gate.",
      adversary: null,
      env: null,
      north: PALAESTRA,
      east: null,
      west: null,
      south: null,
      up: null,
      down: null
    },
    { name: "Gladiator Field",  // 1 PALAESTRA 
      visited: false,
      arrival: null,
      look: "You are standing in a grassy field that appears to have been long-used for sports or fighting. There are ruins to the north, a wall with an entrance to the east, and a wall with a gate to the south.",
      adversary: null,
      env: null,
      north: STATUE_CENTAUR,
      east: AMPHITHEATRE,
      west: null,
      south: SOUTH_GATE,
      up: null,
      down: null
    },
    { name: "Amphitheatre",   // 2 AMPHITHEATRE
      visited: false,
      arrival: null,
      look: "You are in a large amphitheatre with stone seating all around. A door leads west. To the north is a road.",
      adversary: null,
      env: null,
      north: DECUMANUS_EAST,
      east: null,
      west: PALAESTRA,
      south: null,
      up: null,
      down: null
    },
    { name: "Decumanus Maximus East", // 3 DECUMANUS_EAST 
      visited: false,
      arrival: null,
      look: "You are at the end of a large east-west main road that cuts across the city to the west. There is an entrance to a large building to the south.",
      adversary: null,
      env: null,
      north: null,
      east: null,
      west: DECUMANUS_CENTER,
      south: AMPHITHEATRE,
      up: null,
      down: null
    },

...
Some of the essential properties for each room include its name, a previously-visited flag, special text to add on first arrival, a look description for the LOOK command, and where the six movement commands lead. There is also an adversary variable which tells the game whether some enemy is lurking in the room. Lastly, an environment variable tracks whether a room has an interesting environment attribute such as being dark: in a dark room you can't see anything unless you happened to bring a light source with you.

Object data is handled the same way: there are constants to make it easy to reference a particular object by name in code, and then an array of objects for each game object.
// Object IDs

const MAX_ITEMS_CARRIED = 5;

const BRONZE_COIN = 0;
const BOTTLE = 1;
const JUG = 2;
const KNIFE = 3;

...

 // Object detail

  session.objects = [ 
  {   name: "bronze coin",        // 0 BRONZE_COIN
      room: HOUSE_MENANDER_YARD,
      examine: "It is an old coin made of bronze with a horse on its face.",
      carrying: false,
      disallow: null,
  },
  {   name: "bottle",
      room: HOUSE_MENANDER_ATRIUM,
      examine: "It is a bottle of wine.",
      carrying: false,
      disallow: null,
  },
  {   name: "jug",
      room: SIDEWALK,
      examine: "It is an empty pottery jug.",
      carrying: false,
      disallow: DOG,
      disallowDesc: "The dog growls fiercely whenever you approach the jug."
  },

...
Object properties include the object's name, so that you can issue commands like TAKE BRONZE COIN or EXAMINE BOTTLE. There's also the room the object is in, an examine description for the EXAMINE command, and a carrying flag to indicate whether the player is currently carrying it. The disallow property, if not null, means the object can't be taken because of an adversary.

Although most rooms can be navigated to with NORTH, EAST, WEST, SOUTH, etc., some rooms are initially not accessible or even hidden. It takes puzzle solving by acquiring, transporting, and using objects to get to those areas. To invent some game puzzles, I considered non-intuitive paths to some places; natural obstacles; beasts that might not let you pass; and people that might not let you take something you need.

Game Code

The game code itself is simple. Each of the available commands needs an implementation:
  • INVENTORY simply lists each item in the objects array where the carrying flag is true.
  • TAKE object checks whether the specified object name exists. If found in the objects array, and in the current room, and not already being carried, the object can be picked up. The carrying flag is set to true and it is now a carried object.
  • DROP object works just like TAKE, except it can only be applied to an object with the carrying flag set to true. The carrying flag is set to false, and the object's room property is set to the current room.
  • The EXAMINE object command searches for an item in the objects array matching the specified name. If found, and the object is being carried or is in the current room, its examine property is described. Special code allows the player to sometimes examine other things, such as a statue in the room.
  • The LOOK command describes your current surroundings. It first displays or speaks rooms[room].description, the general description of the room you're in. It must also tell you if any objects are present. Unless in a dark room without a light source, each item in the object array is described if its room property matches the current room and the carrying flag is false).
  • The GIVE object or USE object command does something special with an object in order to solve a game puzzle such as defeating an adversary. Special game code checks for specific objects. With a more sophisticated implementation, these things could be represented in the game data itself but I was umm... lazy in these initial implementations.
Here's the code that implements directional movement (NORTH, SOUTH, EAST, WEST, UP, DOWN). After identifying a direction command, the room object for the current room's .north, .south, .east, .west, .up, or .down property is passed to the moveTo function. If moveTo is passed a null, movement is impossible. Otherwise, the current room is set to the passed room. If the new room object's visited flag is already true, this is a return to a prior room and a full description is skipped; but the user can always request that with a LOOK command. For interfaces with a visual element, a picture for the current room number is shown (unless it's dark and you have no light source). Other functions are called to also describe what's in the room with you.
  switch(words[0]) {
    ...
        // Move to a new room
        case "NORTH":
        case "N":
          moveTo(session.rooms[session.room].north);
          break;
        case "EAST":
        case "E":
          moveTo(session.rooms[session.room].east);
          break;
        case "WEST":
        case "W":
          moveTo(session.rooms[session.room].west);
          break;
        case "SOUTH":
        case "S":
          moveTo(session.rooms[session.room].south);
          break;
        case "UP":
        case "U":
          moveTo(session.rooms[session.room].up);
          break;
        case "DOWN":
        case "D":
          moveTo(session.rooms[session.room].down);
          break;
  ...

  function moveTo(newRoom) {
    try {
      var text = '';
      if (newRoom != null) {
        session.room = newRoom;
        if (session.rooms[session.room].visited) {
          text = "You're back at " + session.rooms[session.room].name + ". ";
        }
        else {
          if (session.rooms[session.room].arrival!==null)
            text = session.rooms[session.room].arrival + session.rooms[session.room].look + " ";
          else
            text = session.rooms[session.room].look + " ";
          session.rooms[session.room].visited = true;
        }
        session.location = session.rooms[session.room].name;
        session.output = text;
        if (isDark())
          session.imageUrl = image('dark.jpg');
        else
          session.imageUrl = image(session.room.toString() + '.jpg');  
        listObjectsInRoom();
        listAdversariesInRoom();
      }
      else {
        session.output = "I can't move that way. ";
      }
  }
  catch(e) {
      session.output = "An exception occurred";
    console.log("EXCEPTION" + e.toString());
  }
}
In designing an Adventure game, one must try to anticipate everything a player might try. For a consistent and enjoyable game, logical conclusions should be honored: if a player went NORTH to get from Room A to Room B, then SOUTH from Room B should lead back to Room A. There can be exceptions however: since the places we're describing are not necessarily rectangular, we don't always have to honor the obvious routes. Twisty passages in a maze may lead the player to unexpected places; and there may be the occasional magical secret door that whisks the player to a completely different area of the world.

A single-level world is not as interesting as a multi-level world. Most of what I'd seen in Pompeii had been single-story buildings. I could surely invent some higher structures, which would allow some UP and DOWN navigation.

What about a subterranean level? That was a mainstay of Colossal Caves Adventure. Thinking back to our trip to Europe, we had also visited underground catacombs (where early Christians buried their dead), which were networks of many underground rooms. I decided this would make for a good subterranean level in Roman Ruins Adventure, with a handful of places that allow one to travel below ground level and back up. Since the real-world catacombs are mysterious twisty places that are hard to navigate, I would design accordingly. I would also require a light source in order to see anything in these rooms.

Frustratingly, our visit to the Roman catacombs visit didn't allow picture-taking. I decided this would be the place for my version of "Twisty little passages, all alike." I have a similar (but subtly different) description for each area, with the same cave image; unless it's dark, in which case everything is pitch black. I know some players groan when they encounter these areas but since my game is a homage to the original Adventure I really do have to have one.

Conclusion

The original Adventure was ground-breaking and has a large legacy of game infuence that continues on to this day. I spent the last week creating my own Adventure game, on a smaller scale. Today we examined some of the game design. It could be a lot bigger: there are only a couple dozen rooms at present. All it will take to expand it is some creative thought and some more game data.

My week of development targeted creating a basic game, an implementation for Alexa, and an implementation for a Twitch Minigame Extension. I completed all that, but I'll admit there could be a lot more refinement. The game could be expanded with more rooms, more of a narrative to discover, and more game puzzles. The implementations could be more polished and there should be more shared code. I likely will return to all of this and take it further at some point, but I am satisfied with this first week's effort. It was an Adventure!

In Part 2, we'll look at my implementaton of Roman Ruins Adventure for Alexa.

In Part 3, we'll look at my implementation of Roman Ruins Adventure as a Twitch Mini-game.

Next: Part 2: Alexa Skill