Recently I blogged on the importance of not being a "lopsided" web developer. Meaning, our new HTML5 (etc.) web stack is not only new, it's massive. It's not one technology to learn, it's many. Along with technology there are techniques and architectural patterns to master. I recently gave a talk on the subject at So Cal Code in USC, and my presentation is now up on SlideShare for anyone who'd like to view it.

Showing posts with label CSS. Show all posts
Showing posts with label CSS. Show all posts
Sunday, October 14, 2012

Wednesday, August 22, 2012
Contrasting Windows 8 Development in HTML5/JavaScript with Web Development
One of the nice features of Windows 8 development is that WinRT, the Windows Runtime, permits apps to be developed in HTML5/CSS/JavaScript (the other two choices are .NET/XAML and C++/XAML). If you're involved in modern web development, the HTML5 approach may be attractive to you. There are however some differences between HTML5 web development and Windows 8 development you should be aware of.
1. No Need for Cross-Browser Support or Feature Availability Checking
In a standard modern web app, you've got to deal with the reality that users will use different browsers (and different versions of those browsers). This is usually handled with shims and polyfills (especially Modernizr) and specific checking for browser features with fallback behaviors.
In Windows 8 development, there's only one target browser: IE10. There are no other browsers to be concerned about. You can also freely take advantage of IE10-specific features, such as CSS Grid, that you might have been hesitant to use in the past because they weren't supported broadly enough.
2. External References are Disallowed
It's common in web apps to reference external stylesheets or scripts, especially to access open source JavaScript libraries via CDNs. In Windows 8 external references are disallowed as a security risk. This means your stylesheets and scripts must be local to the application.
3. Some DOM Operations are Disallowed
It's rather normal for modern web applications to manipulate the DOM, for example to set the innerHTML property of elements. But WinRT is picky about allowing this, and you just might get an error like this:
HTML1701: Unable to add dynamic content ' a' A script attempted to inject dynamic content, or elements previously modified dynamically, that might be unsafe. For example, using the innerHTML property to add script or malformed HTML will generate this exception. Use the toStaticHTML method to filter dynamic content, or explicitly create elements and attributes with a method such as createElement. For more information, see http://go.microsoft.com/fwlink/?LinkID=247104.
Don't fret, you can modify the DOM as long as you following Windows 8's rules, which are described here. This can in fact stop popular JavaScript libraries from working. To make jQuery work, you need this work-around.
4. There's no server - and no 'home domain'
In a standard web site, you have a server and your Ajax calls are pretty much restricted to that domain for security reasons. In Windows 8, there's no implicit server and therefore no implicit domain. You can freely perform Internet access using the WinJS.xhr method.
This doesn't mean you can't have a back-end, you certainly can (and Windows Azure is a particularly good choice for your back-end services).
5. A Windows 8 App is Not a Web Site
Although you can transplant a web site into a Windows 8 app without too much trouble, you need to be conscious of the differences between a Windows 8 app and a web site. A Windows 8 app has certain standards for styling, user interface, behaviors, security, etc. that must be conformed with in order to be accepted into the Windows Store. Windows 8 apps have special artifacts such as the App Bar and Live Tiles which you'll need to add.
Having said that, there is plenty from the web world you can apply to an HTML5 Windows 8 app. You can use many of your favorite libraries and frameworks, including Twitter Bootstrap for responsive web design that adapts layout to various form factors and orientations.
6. Windows 8 Apps Have a Specific Lifecycle
A Windows 8 app that holds state needs to be able to quickly save that state when being deactivated by the operating system, and likewise restore it when revived. You'll need to include JavaScript code in events such as onactivated to handle this.
7. Windows 8 Apps are Sandboxed and Require Use of the WinJS API
Windows 8 apps are sandboxed, meaning they can't do much on their own except when you go through the WinJS API. The WinJS API provides many methods which you'll have to use in order to perform communication, get user information, share with other applications, and access resources managed by the operating system such as file storage or contacts. Some things which you might be used to handling in other ways must use the WinJS API in Windows 8, period.
8. Touch Needs to be a First-Class Consideration
If your past web development hasn't focused on touch support, it will need to in Windows 8. This is more than a finger touch equaling a click event: Windows 8 users expect to be able to use swiping and other gestures. Not everything you do in HTML5 will automatically work with touch; for example, HTML5 Drag and Drop works with a mouse in Windows 8 but does not respond to touch. You'll want to ensure touch is well supported by your app and of course you don't want to forsake mouse and keyboard users either. Take advantage of the Windows 8 Simulator in Visual Studio 2012, which can simulate touch if you aren't developing on a touch-capable machine.
So what' s the bottom line on Windows 8 development in HTML5/JavaScript? It's certainly viable, and can allow you to transplant existing markup, CSS, and code--and use many of your favorite frameworks and libraries--but the aforementioned considerations will need to be dealt with. Ultimately, leveraging your web skills in Windows 8 development is useful but a Windows 8 app is not a web site and it's a mistake to forget that. A satisfying Windows 8 app--regardless of which language path you use to develop it--must conform to the conventions and spirit of the platform.
1. No Need for Cross-Browser Support or Feature Availability Checking
In a standard modern web app, you've got to deal with the reality that users will use different browsers (and different versions of those browsers). This is usually handled with shims and polyfills (especially Modernizr) and specific checking for browser features with fallback behaviors.
In Windows 8 development, there's only one target browser: IE10. There are no other browsers to be concerned about. You can also freely take advantage of IE10-specific features, such as CSS Grid, that you might have been hesitant to use in the past because they weren't supported broadly enough.
2. External References are Disallowed
It's common in web apps to reference external stylesheets or scripts, especially to access open source JavaScript libraries via CDNs. In Windows 8 external references are disallowed as a security risk. This means your stylesheets and scripts must be local to the application.
3. Some DOM Operations are Disallowed
It's rather normal for modern web applications to manipulate the DOM, for example to set the innerHTML property of elements. But WinRT is picky about allowing this, and you just might get an error like this:
HTML1701: Unable to add dynamic content ' a' A script attempted to inject dynamic content, or elements previously modified dynamically, that might be unsafe. For example, using the innerHTML property to add script or malformed HTML will generate this exception. Use the toStaticHTML method to filter dynamic content, or explicitly create elements and attributes with a method such as createElement. For more information, see http://go.microsoft.com/fwlink/?LinkID=247104.
Don't fret, you can modify the DOM as long as you following Windows 8's rules, which are described here. This can in fact stop popular JavaScript libraries from working. To make jQuery work, you need this work-around.
4. There's no server - and no 'home domain'
In a standard web site, you have a server and your Ajax calls are pretty much restricted to that domain for security reasons. In Windows 8, there's no implicit server and therefore no implicit domain. You can freely perform Internet access using the WinJS.xhr method.
This doesn't mean you can't have a back-end, you certainly can (and Windows Azure is a particularly good choice for your back-end services).
5. A Windows 8 App is Not a Web Site
Although you can transplant a web site into a Windows 8 app without too much trouble, you need to be conscious of the differences between a Windows 8 app and a web site. A Windows 8 app has certain standards for styling, user interface, behaviors, security, etc. that must be conformed with in order to be accepted into the Windows Store. Windows 8 apps have special artifacts such as the App Bar and Live Tiles which you'll need to add.
Having said that, there is plenty from the web world you can apply to an HTML5 Windows 8 app. You can use many of your favorite libraries and frameworks, including Twitter Bootstrap for responsive web design that adapts layout to various form factors and orientations.
6. Windows 8 Apps Have a Specific Lifecycle
A Windows 8 app that holds state needs to be able to quickly save that state when being deactivated by the operating system, and likewise restore it when revived. You'll need to include JavaScript code in events such as onactivated to handle this.
7. Windows 8 Apps are Sandboxed and Require Use of the WinJS API
Windows 8 apps are sandboxed, meaning they can't do much on their own except when you go through the WinJS API. The WinJS API provides many methods which you'll have to use in order to perform communication, get user information, share with other applications, and access resources managed by the operating system such as file storage or contacts. Some things which you might be used to handling in other ways must use the WinJS API in Windows 8, period.
8. Touch Needs to be a First-Class Consideration
If your past web development hasn't focused on touch support, it will need to in Windows 8. This is more than a finger touch equaling a click event: Windows 8 users expect to be able to use swiping and other gestures. Not everything you do in HTML5 will automatically work with touch; for example, HTML5 Drag and Drop works with a mouse in Windows 8 but does not respond to touch. You'll want to ensure touch is well supported by your app and of course you don't want to forsake mouse and keyboard users either. Take advantage of the Windows 8 Simulator in Visual Studio 2012, which can simulate touch if you aren't developing on a touch-capable machine.
So what' s the bottom line on Windows 8 development in HTML5/JavaScript? It's certainly viable, and can allow you to transplant existing markup, CSS, and code--and use many of your favorite frameworks and libraries--but the aforementioned considerations will need to be dealt with. Ultimately, leveraging your web skills in Windows 8 development is useful but a Windows 8 app is not a web site and it's a mistake to forget that. A satisfying Windows 8 app--regardless of which language path you use to develop it--must conform to the conventions and spirit of the platform.
Sunday, April 1, 2012
Outside-the-Box Pizza, Part 2: HTML5, CSS and Browser Compatibility
In this series, we’re looking at Outside-the-Box Pizza, a web-mobile-social-cloud demo, from a variety of perspectives that include design, technologies, and techniques. The online demo is at http://outsidetheboxpizza.com. Here in Part 2, we’ll be looking at the use of HTML5 and CSS in the front-end. Specifically, we’ll explore how we used the following:
• HTML5 doctype
• HTML5 semantic elements
• HTML5 video
• Non-HTML5 browser support
• HTML5 semantic elements
• HTML5 video
• Non-HTML5 browser support

HTML5 DocType
This is an HTML5 site, and so we are taking advantage of the
HTML5 document type and elements. First off, that means specifying DOCTYPE
html, which is refreshingly short and
simple compared to the monstrous doctype required by earlier editions of HTML.
<!DOCTYPE html>
We can take advantage of semantic tags in HTML5, which allow
us to use more meaningful element names in place of over-using DIVs as we had
to in the past. Let’s look at the tags we’re using, along with the
corresponding CSS styling.
Header & Footer
We are able to use header and footer tags for our
top-of-page and bottom-of-page elements. The header is a medium red and the
footer is a dark red.
<header>
<div id="banner" class="content-wrapper">
<div id="logo" class="logo">
<div>outside the box <b>pizza</b> <img src="http://outsidetheboxpizza.blob.core.windows.net/images/icon.png" alt="icon" /></div>
<div><i>pizza as individual as you are.</i></div>
</div>
</div>
</header>
header {
    clear: both;
    background-color: #c00000;
    font-size: .8em;
    height: 4.0em;
}

<footer>
    <div class="content-wrapper" style="line-height: 3.0em">
        <div class="logo">
        <span style="float: left; color: White; font-size: 0.65em; margin-right: 8px;"><a style="color: White; font-size: 0.75em" href="/Activity">Sales</a></span>
        <span style="float: left; color: White; font-size: 0.65em; margin-right: 8px;"><a id="StoreLink" style="color: White; font-size: 0.75em" href="/Store/Orders/926">Store</a></span>
        <span style="float: left; color: White; font-size: 0.65em; margin-right: 8px;"><a id="DeliveryLink" style="color: White; font-size: 0.75em" href="/Store/Driver/926">Driver</a></span>
        <span style="float: right; color: White; font-size: 0.65em; margin-right: 10px"><a style="color: White; text-decoration: none; font-size: 0.75em" href="/Home/About">About</a></span>
    </div>
    </div>
</footer>
footer
{
    clear: both;
    background-color: #700000;
}

There’s more to the footer than meets the eye, because it is “sticky” and anchored to the bottom of the page. We did that using the technique shown here, which we’ll explain in an upcoming post in this series.
Headings
We use an hgroup tag to enclose heading elements h1 and h2,
styled to appear inline next to each other.
<hgroup class="title">
    <h1>Pizza Sightings</h1>
    <h2>Unique customers, unique pizzas.</h2>
</hgroup>
hgroup.title {
    margin-bottom: 0px;
    margin-top: 0px;
}

hgroup.title h1, hgroup.title h2 {
    display: inline;
}

hgroup.title h2 {
    font-weight: normal;
    margin-left: 3px;
}

h1 {
    font-size: 1.8em;
}

h2 {
    font-size: 1.5em;
}

Article
We use the article element to house primary content on the pages.
We use the article element to house primary content on the pages.
<article>
<span class="text">Here are some of the most interesting pizzas<i>, occasions, or customers</i> we've seen!</span>
<br />
<div class="selectGroup">
    <ul>
      <li class="sighting"><label><img src="~/Images/newyears_pizza.jpg" alt="image"/>Ringing in 2012 with a New Years Pizza<br /><b>@davidpallmann</b></label></li>
      <li class="sighting"><label><img src="~/Images/chocolate_heart_pizza.jpg" alt="image"/>Romantic Pizza for a Sweet Anniversary<br /><b>@joepizza</b></label></li>
      <li class="sighting"><label><img src="~/Images/shape_square.png" alt="image"/>Square Borg Pizza for Trekkie Convention<br /><b>@pizzamonger</b></label></li>
      <li class="sighting"><label><img src="~/Images/face_pizza.jpg" alt="image"/>8 year-old's Birthday is Special with a Happy Face Pizza<br /><b>@davidpallmann</b></label></li>
    </ul>
  </div>
</article>
article {
    float: none;
    width: 100%;
    font-size: 0.8em;
}

HTML5 Video
The home page of outsidetheboxpizza.com contains two videos, one about fresh ingredients and one about pizza making artistry. We use HTML5 native video for these, which include in-browser video controls. Below you see how the video controls appear in the popular browsers—not identical, but similar.

HTML5 Video in Chrome
(top left), Firefox (top right),
IE9 (bottom left), and Safari (bottom right)
<ul class="imagelist">
  <li>
    <video controls>
    <source src="http://outsidetheboxpizza.blob.core.windows.net/video/freshingredients.mp4" type="video/mp4" />
    <source src="http://outsidetheboxpizza.blob.core.windows.net/video/freshingredients.ogg" type="video/ogg" />
    </video>
  </li>
  <li>
    <video controls poster="~/Images/pizzacollage.png">
    <source src="http://outsidetheboxpizza.blob.core.windows.net/video/pizzacollage.mp4" type="video/mp4" />
    <source src="http://outsidetheboxpizza.blob.core.windows.net/video/pizzacollage.ogg" type="video/ogg" />
    (unable to play video on this browser)
    </video>
  </li>
</ul>
.imagelist { margin-top: 16px; margin-left: 0; margin-right: 0; padding: 0; text-align: center }
.imagelist li { display: inline; text-align: center }
.imagelist li img { max-height: 190px; max-width: 100% }
To cover the mainstream browsers well, our video is available
in several formats: H.264 mp4 which is accepted by the majority, and OGG/Theora
for Firefox. The Mozilla organization recently announced it will be supporting
H.264 in the future, which means we’ll soon only have to encode our videos only
one way. If the browser can’t play any of the video encodings we supply, the
message “(unable to play video on this browser)” will be displayed.

Outside the Box Pizza on Internet Explorer 8
Backward Compatibility
for Non-HTML5 Browsers
In the previous image, you see Outside-the-Box Pizza as it
appears today under IE8: it looks as intended, except it can’t provide the
HTML5 video. Originally, though, the site looked awful on IE8 (below).

Original appearance on IE8 before adding Modernizr
To make the site look decent on non-HTML5 browsers, you can
use a shim to “teach” older browsers about HTML5 elements. We used the
Modernizr library, which includes html5shiv, one of the most popular shims. All
we had to do was add this single line to our HTML to include Modernizr, and the
site is now looking fine in non-HTML5 browsers.
<script src="http://ajax.aspnetcdn.com/ajax/modernizr/modernizr-2.0.6-development-only.js"></script>
While using Modernizr won’t give us all of the HTML5 features, it does allow us to use the modern document structure and render acceptably on older browsers. In addition, we can also use this library for conditional CSS or JavaScript code based on the availability of features in a user's browser. For example, if we wanted to we could test for HTML5 video and if the feature was not present then fall back on a Silverlight or Flash video player.
Summary
Outside-the-Box Pizza uses HTML5 document structure and semantic elements, which simplify the markup and make it more meaningful to human beings. Using
HTML5 and native video without plug-ins gives the site broad reach across
browsers and modern devices. Using Modernizr helps greatly in making the site usable on older browsers.
Outside-the-Box Pizza leverages open standards on the web client, but it also makes use of the Microsoft web platform and cloud platform on the back end. We'll see how in future installments in this series.
Next: Part 3: Mobility & Responsive Web Design
Next: Part 3: Mobility & Responsive Web Design
Tuesday, January 17, 2012
Adventures in HTML5: Debug Hero game featuring CSS Sprites and jQuery Animation
I’ve created my first HTML5 game, which I call Debug Hero.
You can play it online here. The
object is to kill bugs. This is not an HTML5 canvas game; rather, it uses CSS
sprites and jQuery animation, combined with purchased stock art characters and
backgrounds. The art came from several different sources but works well
together.

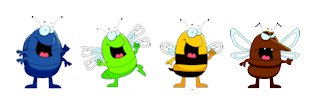
In Debug Hero, you’re the nerd and it’s your job, naturally,
to kill all the bugs. On each level, the variety of bugs increases and so does
the effectiveness of your weapon. Bugs include the ground-based roly poly, the
low-flying dragonfly, the high flying bees, and the mosquito (which can end the
game for you if you get stung). Your weapons begin with a spray can of
insecticide, then you graduate to a small sprayer and then a large sprayer. You
need a certain amount of energy to operate your weapon, and you can recharge by
visiting the vending machine for some caffeine.
Here’s the entire body of the page, which couldn’t be
simpler: it’s just divs.
<div id="canvas" class="canvas1" >
<div id="message" class="message" > div>
<div id="level" class="level"> div>
<div id="energy" class="energy10" > div>
<div id="toolbox" class="sprite toolbox" >div>
<div id="vending" class="sprite vending" >div>
<div id="vendingLogo" class="sprite vendingLogo" >div>
<div id="vendingLogo" class="sprite vendingLogo" >div>
<div id="weapon" class="sprite" >div>
<div id="nerd" class="sprite geek1" >div>
<div id="bug0" class="sprite hiddenbug" >div>
<div id="bug1" class="sprite hiddenbug" >div>
<div id="bug2" class="sprite hiddenbug" >div>
<div id="bug3" class="sprite hiddenbug" >div>
<div id="bug4" class="sprite hiddenbug" >div>
<div id="bug5" class="sprite hiddenbug" >div>
<div id="bug6" class="sprite hiddenbug" >div>
<div id="bug7" class="sprite hiddenbug" >div>
<div id="bug8" class="sprite hiddenbug" >div>
<div id="bug9" class="sprite hiddenbug" >div>
<div id="bug10" class="sprite hiddenbug" >div>
<div id="bug11" class="sprite hiddenbug" >div>
I’m using CSS sprites to avoid lots of image downloads.
Characters like the bee bug have several different appearances (standing,
dancing, afraid) but are contained in a single image. By changing the CSS class
on a div I can change the appearance to select the portion of the image I want
to be visible. The other bugs types, weapons, and the nerd are all handled with
this technique.
.beebug1 { background: transparent url('../../Content/Images/bugbee_sprites.png')
0px 0px; height: 70px; width: 70px }
.beebug2 { background: transparent url('../../Content/Images/bugbee_sprites.png')
0px -70px; height: 70px; width: 70px }
.beebugHit { background:
transparent url('../../Content/Images/bugbee_sprites.png')
0px -140px; height: 70px; width: 70px }

Here’s the CSS for the game, also short and sweet:
.canvas1 { position: relative; top: 0px; left: 0px; width: 800px; height: 800px; background: black url('../../Content/Images/background1.png')
}
.canvas2 { position: relative; top: 0px; left: 0px; width: 800px; height: 800px; background: black url('../../Content/Images/background2.png')
}
.sprite { display: inherit; position: absolute; height: 100px; width: 100px; float: none }
/* Notification */
.message { position: absolute; background: transparent; color: White; font-family: Arial; font-size: 1.75em; opacity: 0.5; width: 800px; top: 10px; left: 10px }
.level { position: absolute; background: transparent; color: White; font-family: Arial; font-size: 1.75em; opacity: 0.5; width: 800px; top: 10px; left: 350px }
/* Bug sprites */
.hiddenbug { display:
none; }
.beebug1 { background: transparent url('../../Content/Images/bugbee_sprites.png')
0px 0px; height: 70px; width: 70px }
.beebug2 { background: transparent url('../../Content/Images/bugbee_sprites.png')
0px -70px; height: 70px; width: 70px }
.beebugHit { background:
transparent url('../../Content/Images/bugbee_sprites.png')
0px -140px; height: 70px; width: 70px }
.dragonflybug1 { background:
transparent url('../../Content/Images/bugdragonfly_sprites.png')
0px 0px; height: 70px; width: 70px }
.dragonflybug2 { background:
transparent url('../../Content/Images/bugdragonfly_sprites.png')
0px -70px; height: 70px; width: 70px }
.dragonflybugHit { background:
transparent url('../../Content/Images/bugdragonfly_sprites.png')
0px -140px; height: 70px; width: 70px }
.rolypolybug1 { background:
transparent url('../../Content/Images/bugrolypoly_sprites.png')
0px 0px; height: 70px; width: 70px }
.rolypolybug2 { background:
transparent url('../../Content/Images/bugrolypoly_sprites.png')
0px -70px; height: 70px; width: 70px }
.rolypolybugHit { background:
transparent url('../../Content/Images/bugrolypoly_sprites.png')
0px -140px; height: 70px; width: 70px }
.mosquitobug { background:
transparent url('../../Content/Images/bugmosquito.png')
0px 0px; height: 70px; width: 70px }
/* Nerd sprite */
.geek1 { background: transparent url('../../Content/Images/nerd_sprites_100.png')
0px 0px; }
.geek2 { background: transparent url('../../Content/Images/nerd_sprites_100.png')
0px -100px }
.geek3 { background: transparent url('../../Content/Images/nerd_sprites_100.png')
0px -200px }
/* Status */
.energy0 { position: absolute; background: transparent url('../../Content/Images/energy.png')
0px 0px; height: 29px; width: 175px; top: 4px; left: 622px }
.energy1 { position: absolute; background: transparent url('../../Content/Images/energy.png')
0px -29px; height: 29px; width: 175px; top: 4px; left: 622px }
.energy2 { position: absolute; background: transparent url('../../Content/Images/energy.png')
0px -58px; height: 29px; width: 175px; top: 4px; left: 622px }
.energy3 { position: absolute; background: transparent url('../../Content/Images/energy.png')
0px -87px; height: 29px; width: 175px; top: 4px; left: 622px }
.energy4 { position: absolute; background: transparent url('../../Content/Images/energy.png')
0px -116px; height: 29px; width: 175px; top: 4px; left: 622px }
.energy5 { position: absolute; background: transparent url('../../Content/Images/energy.png')
0px -145px; height: 29px; width: 175px; top: 4px; left: 622px }
.energy6 { position: absolute; background: transparent url('../../Content/Images/energy.png')
0px -174px; height: 29px; width: 175px; top: 4px; left: 622px }
.energy7 { position: absolute; background: transparent url('../../Content/Images/energy.png')
0px -203px; height: 29px; width: 175px; top: 4px; left: 622px }
.energy8 { position: absolute; background: transparent url('../../Content/Images/energy.png')
0px -232px; height: 29px; width: 175px; top: 4px; left: 622px }
.energy9 { position: absolute; background: transparent url('../../Content/Images/energy.png')
0px -261px; height: 29px; width: 175px; top: 4px; left: 622px }
.energy10 { position:
absolute; background:
transparent url('../../Content/Images/energy.png')
0px -290px; height: 29px; width: 175px; top: 4px; left: 622px }
/* Furniture */
.toolbox { background: transparent url('../../Content/Images/toolbox.png')
0px 0px; height: 37px; width: 75px; top: 720px; left: 30px; }
.vending { background: transparent url('../../Content/Images/vending_machine_100.png')
0px 0px; height: 120px; width: 49px; top: 620px; left: 720px; }
.vendingLogo { background:
transparent url('../../Content/Images/sodacan.png')
0px 0px; height: 37px; width: 37px; top: 620px; left: 720px; }
.vendingLogo2 { background:
transparent url('../../Content/Images/NeudesicLogoIcon.png')
0px 0px; height: 36px; width: 36px; top: 620px; left: 720px; }
/* Weapon sprites */
.left-facing { -moz-transform:
scaleX(-1); -o-transform:
scaleX(-1); -webkit-transform:
scaleX(-1); transform:
scaleX(-1); filter:
FlipH; -ms-filter:
"FlipH"; }
.weapon1 { background: transparent url('../../Content/Images/spraycan.png');
height: 29px; width: 25px; }
.weapon2 { background: transparent url('../../Content/Images/sprayer-yellow.png');
height: 34px; width: 21px; }
.weapon3 { background: transparent url('../../Content/Images/sprayer-orange.png');
height: 62px; width: 34px; }
.weapon4 { background: transparent url('../../Content/Images/honey.png');
height: 62px; width: 42px; }
The biggest part of the game is the JavaScript code which
has the game logic, game.js. Bugs are stored in JSON objects like these:
bugs.push({
id: 'bug0',
obj:
$('#bug0'),
type:
'mosquito',
x:
100,
y:
100,
alive: true,
hit: false,
hitDelay: 0
});
jQuery animations are used to move the characters. For
example, here’s a bug movement being animated:
bug.obj.animate({
top: y,
left: x
}, 900);
The cloud of insecticide
emitted by the weapons is another matter: it swells, floats slowly upward, and
fades. For this I used the smoke puffing effect from http://www.gayadesign.com/diy/puffing-smoke-effect-in-jquery/
with some minor modifications.

In the more advanced levels, you are combating multiple kinds of bugs at the same time. You can go to a toolbox and
select from a variety of different weapons.

As you can see, CSS sprites and jQuery animation are quite powerful.
I have plans to also support touch so Debug Hero can be played on tablets and perhaps even phones at some point but that's not in place yet.
Debug Hero is hosted in the Windows Azure cloud but could really be hosted anywhere as there's no server-side logic or storage.
Regrettably I can’t release the source code for Debug Hero since
I’m using stock art I can't distribute.
Subscribe to:
Posts (Atom)