At SoCal Code Camp I recently gave a session on Windows 8 and the Cloud. My presentation is now available on SlideShare.
I've also blogged directly on the subject here.

Showing posts with label Metro. Show all posts
Showing posts with label Metro. Show all posts
Sunday, October 14, 2012

Wednesday, August 1, 2012
Adventures in Windows 8: Timer Metro App
As part of learning Windows 8 I am create Metro apps large and small almost daily, and I'll be sharing some of those here on this blog. Today I'll share Timer, a simple countdown-timer app you might use if you were giving a classroom presentation that had a hands-on exercise or a test where you need a "time remaining" clock.
Like many of the Metro apps I create, this one is in HTML5. The Windows runtime (WinRT) allows development in C++, .NET, or HTML5/JavaScript with equal treatment for each development path. The runtime API for JavaScript is called WinJS.
Tour of the App
Here's what Timer looks like when you run it. You enter the number of minutes and click the Start button.

Once you click Start, you get a display that shows minutes remaining and counts down to 0.

Graphically, seconds remaining is shown by an inner circle and minutes remaining by an outer circle.
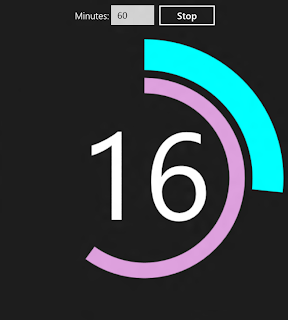
Once the timer reaches zero, the rings turn red and audible alarm plays - time's up!

That's about all there is to the app. You can also stop the timer early on with the Stop button and restart it.
The HTML
Here's the HTML markup for the app, which you can see is very short. The primary elements are start and stop buttons that reference JavaScript start() and stop() functions, and an HTML5 canvas where the graphical timer will be rendered. There's also an <audio> tag for the alarm sound.
And here's the JavaScript, also fairly small. The largest function is showTime(), which displays the timer on the canvas.
var canvas = document.getElementById("canvas");
var context = canvas.getContext("2d");
We use the arc function to draw the circles or partial circles for minutes and seconds, but we have to convert to the way the arc function thinks, shown below.

In JavaScript we can multiply the starting and ending minute points around the clock (0-59) times Math.PI to get the angles we need.
var x = canvas.width / 2;
var y = canvas.height / 2;
var radius = 200;
var startAngle = 0 * Math.PI;
var endAngle = ((minutes) / 30) * Math.PI;
var counterClockwise = false;
context.beginPath();
context.arc(x, y, radius, startAngle, endAngle, counterClockwise);
context.lineWidth = 50;
context.strokeStyle = "cyan";
context.stroke();
It was a little tricky thinking through the angle orientation, since a clock starts at the top of the circle but the arc function's orientation is 90 degrees to the right. This is solved with translation and rotation.
context.translate(x, y);
context.rotate(-Math.PI / 2);
context.translate(-x, -y);
There you have it - a simple, but functional Metro app that may come in handy the next time you're teaching a class.
Like many of the Metro apps I create, this one is in HTML5. The Windows runtime (WinRT) allows development in C++, .NET, or HTML5/JavaScript with equal treatment for each development path. The runtime API for JavaScript is called WinJS.
Tour of the App
Here's what Timer looks like when you run it. You enter the number of minutes and click the Start button.

Once you click Start, you get a display that shows minutes remaining and counts down to 0.

Graphically, seconds remaining is shown by an inner circle and minutes remaining by an outer circle.

Once the timer reaches zero, the rings turn red and audible alarm plays - time's up!

That's about all there is to the app. You can also stop the timer early on with the Stop button and restart it.
The HTML
Here's the HTML markup for the app, which you can see is very short. The primary elements are start and stop buttons that reference JavaScript start() and stop() functions, and an HTML5 canvas where the graphical timer will be rendered. There's also an <audio> tag for the alarm sound.
<!DOCTYPE html>
<html>
<head>
<meta charset="utf-8" />
<title>Timer</title>
<!-- WinJS references -->
<link href="//Microsoft.WinJS.1.0.RC/css/ui-dark.css" rel="stylesheet" />
<script src="//Microsoft.WinJS.1.0.RC/js/base.js"></script>
<script src="//Microsoft.WinJS.1.0.RC/js/ui.js"></script>
<!-- Timer references -->
<link href="/css/default.css" rel="stylesheet" />
<script src="/js/default.js"></script>
</head>
<body>
<div data-win-control="WinJS.UI.ViewBox">
<div class="fixedlayout">
<div class="center">
<div class="center">
<p>Minutes: <input type="text" id="minutes" size="4" value="60" />
<button id="startButton" onclick="start()">Start</button>
<button id="stopButton" onclick="stop()" style="display:none">Stop</button></p>
</div>
<canvas id="canvas" class="center" height="600" width="600"></canvas>
</div>
</div>
</div>
<audio id="alarm">
<source src="audio/timer.mp3" />
</audio>
</body>
</html>
The JavaScriptAnd here's the JavaScript, also fairly small. The largest function is showTime(), which displays the timer on the canvas.
var minutes = 60;
var seconds = 60;
var running = false;

function start() {
    minutes = parseInt(document.getElementById("minutes").value, 10);
    if (minutes > 0) {
        seconds = 60;
        showTime();
        running = true;
        document.getElementById("startButton").style.display = "none";
        document.getElementById("stopButton").style.display = "inline";
        setTimeout(update, 1000);
    }
}

function stop() {
    clearTimeout(update);
    running = false;
    document.getElementById("startButton").style.display = "inline";
    document.getElementById("stopButton").style.display = "none";
}

function update()
{
    if (!running) return;

    seconds--;
    if (seconds === 0) {
        if (minutes > 0) {
            minutes--;
            if (minutes > 0) {
                seconds = 60;
            }
        }
     }
    showTime(minutes);

    if (running) {

        if (minutes > 0 || seconds > 0) {
            setTimeout(update, 1000);
        }
        else {
            alarm = document.getElementById('alarm');
            alarm.play();
            running = false;
            document.getElementById("startButton").style.display = "inline";
            document.getElementById("stopButton").style.display = "none";
        }
    }
}

function showTime() {
    var canvas = document.getElementById("canvas");
    var context = canvas.getContext("2d");
    var x = canvas.width / 2;
    var y = canvas.height / 2;
    var radius = 200;

    var startAngle = 0 * Math.PI;
    var endAngle = ((minutes) / 30) * Math.PI;
    var counterClockwise = false;

    context.save();
    context.clearRect(0, 0, 600, 600);

    context.fillStyle = "#ffffff";
    context.font = "200px Segoe UI";
    context.textAlign = "center";
    context.textBaseline = "middle";
    context.fillText(minutes.toString(), x, y - 15);

    context.translate(x, y);
    context.rotate(-Math.PI / 2);
    context.translate(-x, -y);

    if (minutes > 0 || seconds > 0) {
        context.beginPath();
        context.arc(x, y, radius, startAngle, endAngle, counterClockwise);
        context.lineWidth = 50;
        context.strokeStyle = "cyan";
        context.stroke();
    }
    else {
        context.beginPath();
        context.arc(x, y, radius, 0 * Math.PI, 2 * Math.PI, counterClockwise);
        context.lineWidth = 50;
        context.strokeStyle = "red";
        context.stroke();
    }

    radius = 150;

    startAngle = 0 * Math.PI;
    endAngle = ((seconds) / 30) * Math.PI;

    if (minutes === 0 && seconds === 0) {
        context.beginPath();
        context.arc(x, y, radius, 0 * Math.PI, 2 * Math.PI, counterClockwise);
        context.lineWidth = 25;
        context.strokeStyle = "red";
        context.stroke();
    }
    else {
        context.beginPath();
        context.arc(x, y, radius, startAngle, endAngle, counterClockwise);
        context.lineWidth = 25;
        context.strokeStyle = "plum";
        context.stroke();
    }

    context.restore();
}


// For an introduction to the Fixed Layout template, see the following documentation:
// http://go.microsoft.com/fwlink/?LinkId=232508
(function () {
    "use strict";

    var app = WinJS.Application;
    var activation = Windows.ApplicationModel.Activation;
    WinJS.strictProcessing();

    app.onactivated = function (args) {
        if (args.detail.kind === activation.ActivationKind.launch) {
            if (args.detail.previousExecutionState !== activation.ApplicationExecutionState.terminated) {
                // TODO: This application has been newly launched. Initialize
                // your application here.
            } else {
                // TODO: This application has been reactivated from suspension.
                // Restore application state here.
            }
            args.setPromise(WinJS.UI.processAll());
        }
    };

    app.oncheckpoint = function (args) {
        // TODO: This application is about to be suspended. Save any state
        // that needs to persist across suspensions here. You might use the
        // WinJS.Application.sessionState object, which is automatically
        // saved and restored across suspension. If you need to complete an
        // asynchronous operation before your application is suspended, call
        // args.setPromise().
    };

    app.start();
})();
Let's walk through how the showTime() function displays the timer. We get the canvas element by id and then get a 2D drawing context from that. var canvas = document.getElementById("canvas");
var context = canvas.getContext("2d");
We use the arc function to draw the circles or partial circles for minutes and seconds, but we have to convert to the way the arc function thinks, shown below.

In JavaScript we can multiply the starting and ending minute points around the clock (0-59) times Math.PI to get the angles we need.
var x = canvas.width / 2;
var y = canvas.height / 2;
var radius = 200;
var startAngle = 0 * Math.PI;
var endAngle = ((minutes) / 30) * Math.PI;
var counterClockwise = false;
context.beginPath();
context.arc(x, y, radius, startAngle, endAngle, counterClockwise);
context.lineWidth = 50;
context.strokeStyle = "cyan";
context.stroke();
It was a little tricky thinking through the angle orientation, since a clock starts at the top of the circle but the arc function's orientation is 90 degrees to the right. This is solved with translation and rotation.
context.translate(x, y);
context.rotate(-Math.PI / 2);
context.translate(-x, -y);
There you have it - a simple, but functional Metro app that may come in handy the next time you're teaching a class.
Monday, April 23, 2012
Adventures in Windows 8: Task Board, Part 1: An HTML5-JavaScript Metro App
I had an opportunity today to demo a Windows 8 Metro app at
the Windows 8 Developer event in LA along with my Neudesic colleague Mickey
Williams. I’ll describe here in Part 1 the demo app, Task Board, and in
subsequent parts we’ll explore how it was built. Task Board is not a fully
completed application, but its well along and is the result of only 3 days’
work—a testimony to how quickly you can get proficient at Metro app
development. This is also not what I would call a very sophisticated Metro app –
in fact it’s my second Metro app ever, and I’m still learning the ropes.

Tile and Splash Screen


The App Bar is typically shown on the bottom of applications, but I thought it worked better at top in this case. If you find yourself using the App Bar a lot, which you might when heavily editing tasks, you can pin it in place.


Storage
The commands at the right of the App Bar allow new projects to be created, existing projects to be opened, and projects to be saved. There’s also a Sample button which loads a sample project of tasks, making it easy for the application to be demoed.

You can develop Metro apps 3 ways: in C++/Xaml, in
.NET/Xaml, or in HTML5-JavaScript. I can work in all three, but since I’m
investing a lot of time these days in HTML5/JavaScript that was a natural
choice for me. Although WinRT (the Windows runtime) is careful to treat all
three development approaches as equal-class citizens, there is an advantage I
think to the HTML5/JavaScript approach in that you can leverage the mammoth
amount of open source libraries that are out there for the web such as jQuery
and many others.

One of the things you notice with tablets today is that while
they are really popular, most people use them to consume content (books, video),
browse the web, or interact with business-to-consumer apps. There aren’t all that
many examples of productivity apps or business apps on tablets yet. This is
where I think Windows 8 and Metro have an opportunity to really shine: you’ll
be able to get actual work done on Windows 8 tablets.
To have something decent to demo, I decided to create a new Metro application. I chose a task board application, in which you can put “cards on a wall” as an aid in project management. Each card represents a task. A task board is a useful visual aid in project team meetings where you can move cards around and consider "what if's".
Let's take a walk-through of the application.
Tile and Splash Screen
Like all Metro apps, Task Board has a tile in the Start
screen. It’s not a “live tile” yet in that the application doesn’t pass any
notification information up to the tile, but that’s a behavior that could be
added in the future.

Touching or clicking the tile launches Task Board, which
briefly displays this splash screen:

Both the tile and splash screen are simple PNG bitmap
images. There are 4 images in all, named logo.png, smalllogo.png, storelogo.png,
and splash.png.
Views and Navigation
Task Board has two views (with more to come): Task Board and
Rock Wall. Navigation between the views is accomplished with two simple links
at top. Down the road you may see this become sections that you can horizontally
slide between.
Additional views we’re likely to add in the future might also
include an expense view and a workload-per-team member view.
Task Board View
Task Board view is
the “cards on a wall” surface on which you can drag around cards. Dragging is a
good interface for touch devices, but we’ve been careful to make the experience
equally good for mouse and keyboard users as well. If you touch or click on a
card’s border or task number, it will be selected (indicated with a thick
border). If cards overlap, selecting a card brings it topmost.
The cards have fields for title, description, who, hours,
and status (to do, in progress, to verify, or completed). The status field
controls the card color. A task number is displayed at upper right.

To create a task card, or remove a selected task card, you use
the left-side commands on the App Bar. You can bring the App Bar into view by
swiping from the top or bottom of the screen; or via the shortcut key Windows +
Z. Other App Bar commands include Remove All, which deletes all task cards; and
Arrange, which nicely arranges the cards with a smooth animation where they
glide into place.


Rock Wall View
The Rock Wall is a
view of the tasks in terms of size, where tasks are rendered as boulders,
rocks, and stones based on the number of hours. Up to 8 hours is a pebble, up
to 40 hours is a rock, and anything larger is a boulder. The rocks fall into
place in a nice bounce animation.
Background
The default background is a green board, but there are other
choices. There’s a drop-down in the App Bar that lets you select other background
images or background colors. Below is the “Wood” theme.
Storage
The commands at the right of the App Bar allow new projects to be created, existing projects to be opened, and projects to be saved. There’s also a Sample button which loads a sample project of tasks, making it easy for the application to be demoed.

There’s some additional work to be done here on storage,
including project naming and file browsing. What I have in mind is the
device/cloud model, as you may have seen in apps like the latest Kindle app for
iPad. The idea is your central storage is in the cloud (thus freeing you to
change devices whenever you want to), but you can work with the data locally on
your device if you choose to. Not in place yet, but coming. This is part of the
“personal cloud” concept that I am very much a believer in.
Development Approach
This gives you an overview of the application. In Part 2, we’ll
take a look at the internals. Stay tuned!
Monday, April 2, 2012
Adventures in Windows 8: Sticky Notes Metro App
Today I decided it was about time I roll up my sleeves and write my first real Windows 8 'Metro' application--something more substantial than just 'Hello, Metro'. After taking in Dan Wahlin's Metro/HTML5/JavaScript session at DevConnections last week, I figured I was ready. What I created was a Sticky Notes application with persistent storage. You can develop Metro apps 3 ways (C++/XAML, .NET/XAML, or HTML5/JavaScript); since I'm spending a lot of time in HTML5 and JavaScript these days I decided to go down that path.

Inspiration
First I needed an application idea. A sticky notes app is simple enough to do and there are plenty of online web examples of that to use for inspiration. For my Metro app, I would provide the functionality to create, edit, drag and delete notes, storing them with persistence.
I found a good Sticky Notes web example from Design Shack (thank you) and derived from its HTML, CSS and JavaScript in building this application. I also made some improvements such as multiple colors for notes. This sample was a good starting point because the HTML, CSS and JavaScript code is nice and small. It also has drag functionality, provided by the mootools JS library.
Solution Foundation
To create a foundation for the Metro app, I used Visual Studio 11 on a netbook I had received from the Microsoft Professional Developer Conference in 2009. I do have one of the Windows 8 slates from last year's BUILD conference as well, but I find development to be much easier on the netbook--which has a touch screen. Installing Windows 8 on it was easy and problem-free.
I started the solution in Visual Studio 11 with File > New and selected the JavaScript / Windows Metro Style / Blank Application template.

After adding mootools manually (I needed a deprecated version for the web sample I adapted, so could not use the VS11 library package manager), this is the solution structure I ended up with.

HTML5 Surprises
Although you can leverage your HTML5/CSS/JavaScript skills to develop for Metro, that doesn't not mean everything is the same. Although most things I did just worked, I was quite surprised by some of the operations that turned out to be disallowed.
One area disallowed is links to external executable resources. The original web sample I borrowed from had a link to a Google Web Font, but Windows 8 disallowed this as insecure - so I had to settle for setting font family to "Cursive" and letting the system select a font.
I was also surprised to find I could not set the InnerHTML property of my DOM elements, again a security violation in Windows 8's eyes. I really needed to do this, though, in order to add newly created notes to the DOM. To make this work I had to use a setInnerHTMlUnsafe WinJS method.
HTML
Aside from the aforementioned issues, the HTML went smoothly and you can see it below. The container for the notes is just a DIV, and the notes are child DIVs added dynamically.
CSS
Below is the CSS for the application. Again, short and simple.
JavaScript
Most of the code is in the JavaScript. In the listing below, I've left out the persistence code to discuss separately. These functions are concerned with implementing note creation and deletion.
Persistence Code
Metro apps have checkpoint (suspend) and activation events, and its important to store and restore state in these events. Originally, I did this through the WinJS.Application,sessionState object - but I found after some testing, as the name implies, that this storage is not retained past a user session. I then found I could store and retrieve JSON objects easily to file storage. That's what the code below does.
Icons and Splash Screen
Metro apps have several size logo images and a splash screen image, which by default are black-and-white and rather plan, I created versions of these images for Sticky Notes from screen captures of the application, trimmed to the size of the original icons. Here's how the app appears on the Metro start screen:

Usage
The completed app launches and restores and previously saved notes. If it's being launched for the first time, it creates an initial note.
To create a note, the user clicks the New Note button at top left. To delete a note, select the note and then click the Delete Note button that appears at top left. To drag a note, click and hold a note outside of the editable text area, drag and release.,
To edit a note, the user can click and edit the heading or the body This is done with the HTML5 ContentEditable feature, which allows the HTML elements to be directly editable in the browser without the use of form fields. Although the note shape is nominally square, it will stretch vertically for longer notes.

Summary
The source code to Sticky Notes can be downloaded here.
It took a full day and night to get here--with some frustrations along the way--but I'm pleased with the result of my first Windows 8 Metro application, and I certainly learned a lot. Time to start thinking about what to create next...

Inspiration
First I needed an application idea. A sticky notes app is simple enough to do and there are plenty of online web examples of that to use for inspiration. For my Metro app, I would provide the functionality to create, edit, drag and delete notes, storing them with persistence.
I found a good Sticky Notes web example from Design Shack (thank you) and derived from its HTML, CSS and JavaScript in building this application. I also made some improvements such as multiple colors for notes. This sample was a good starting point because the HTML, CSS and JavaScript code is nice and small. It also has drag functionality, provided by the mootools JS library.
Solution Foundation
To create a foundation for the Metro app, I used Visual Studio 11 on a netbook I had received from the Microsoft Professional Developer Conference in 2009. I do have one of the Windows 8 slates from last year's BUILD conference as well, but I find development to be much easier on the netbook--which has a touch screen. Installing Windows 8 on it was easy and problem-free.
I started the solution in Visual Studio 11 with File > New and selected the JavaScript / Windows Metro Style / Blank Application template.

After adding mootools manually (I needed a deprecated version for the web sample I adapted, so could not use the VS11 library package manager), this is the solution structure I ended up with.

HTML5 Surprises
Although you can leverage your HTML5/CSS/JavaScript skills to develop for Metro, that doesn't not mean everything is the same. Although most things I did just worked, I was quite surprised by some of the operations that turned out to be disallowed.
One area disallowed is links to external executable resources. The original web sample I borrowed from had a link to a Google Web Font, but Windows 8 disallowed this as insecure - so I had to settle for setting font family to "Cursive" and letting the system select a font.
I was also surprised to find I could not set the InnerHTML property of my DOM elements, again a security violation in Windows 8's eyes. I really needed to do this, though, in order to add newly created notes to the DOM. To make this work I had to use a setInnerHTMlUnsafe WinJS method.
    var newHTML = '<div id="N' + nextNoteId.toString() + '" class="stickyNote color' + nextColor.toString() + '" onfocus="javascript:notefocus(' + "'" + nextNoteId.toString() + "')" + '"><h1 id="NH' + nextNoteId.toString() + '" contenteditable="true">' + headingText + '</h1><p id="NT' + nextNoteId.toString() + '" contenteditable="true">' + noteText + '</p></div>';
    var oldHTML = document.getElementById('container').innerHTML;
    WinJS.Utilities.setInnerHTMLUnsafe(document.getElementById('container'), oldHTML + newHTML);
HTML
Aside from the aforementioned issues, the HTML went smoothly and you can see it below. The container for the notes is just a DIV, and the notes are child DIVs added dynamically.
<!DOCTYPE html>
<html>
<head>
    <meta charset="utf-8">
    <title>Sticky Notes</title>

    <script src="/Scripts/mootools-1.2.5-with-1.1-classes.js"></script>

    <!-- WinJS references -->
    <link href="//Microsoft.WinJS.0.6/css/ui-dark.css" rel="stylesheet">
    <script src="//Microsoft.WinJS.0.6/js/base.js"></script>
    <script src="//Microsoft.WinJS.0.6/js/ui.js"></script>

    <!-- StickyNotes references -->
    <link href="/css/default.css" rel="stylesheet">
    <script src="/js/default.js"></script>


<style type="text/css">

</style>
<!--<link  href="http://fonts.googleapis.com/css?family=Reenie+Beanie:regular" rel="stylesheet" type="text/css">-->
</head>
<body>
    <div>
        <button id="NewNote" onclick="javascript:NewNote_Click()" >New Note</button>
        <button id="DeleteNote" style="display:  none" onclick="javascript:DeleteNote_Click()" >Delete Note 1</button>
    </div>

  <div id="container">
    <!-- notes will be inserted here -->
</div>

</body>
</html>
CSS
Below is the CSS for the application. Again, short and simple.
body {

}

* {
 margin: 0px;
 padding: 0px;
}

body {
 background-image: url(/Images/bgd.jpg); background-repeat: repeat;
 color: black;
}

button {
    margin:  4px;
}

#container {
 width: 960px;
}

.stickyNote {
 width: 300px;
    min-height: 275px;
 background: -webkit-gradient(linear, 0% 0%, 0% 100%, from(#EBEB00), to(#C5C500));
 background: -moz-linear-gradient(100% 100% 90deg, #C5C500, #EBEB00);
 padding: 20px 20px 20px 20px;
  -webkit-box-shadow: 0px 10px 30px #000;
  -moz-box-shadow: 0px 10px 30px #000;
}

.color1 { background: yellow; }
.color2 { background: pink; }
.color3 { background: cyan; }
.color4 { background: lightgreen; }

.stickyNote h1 {
 font-size: 2.0em;
 font-family: GoodDogRegular, Helvetica, sans-serif;
}

.stickyNote p {
 font-family: cursive, GoodDogRegular, Helvetica, sans-serif;
 font-size: 1.0em;
    line-height: 1.75em;
 margin: 10px 0 10px 0;
 width: 280px;
}
JavaScript
Most of the code is in the JavaScript. In the listing below, I've left out the persistence code to discuss separately. These functions are concerned with implementing note creation and deletion.
// Note: portions of this are derived from an online CSS sticky notes web example
// http://designshack.net/articles/css/create-a-moveable-sticky-note-with-mootools-and-css3

var noteCount = 0;
var nextColor = 1;
var nextNoteId = 1;
var noteIdWithFocus = "0";

window.addEvent('domready', function(){
    $$('#container div').each(function(drag){
        new Drag.Move(drag);});
});


// Create a new note. Increment position automatically.

function NewNote_Click() {
    var headingText = "New Note";
    var noteText = "";
    var newHTML = '<div id="N' + nextNoteId.toString() + '" class="stickyNote color' + nextColor.toString() + '" onfocus="javascript:notefocus(' + "'" + nextNoteId.toString() + "')" + '"><h1 id="NH' + nextNoteId.toString() + '" contenteditable="true">' + headingText + '</h1><p id="NT' + nextNoteId.toString() + '" contenteditable="true">' + noteText + '</p></div>';
    var oldHTML = document.getElementById('container').innerHTML;
    WinJS.Utilities.setInnerHTMLUnsafe(document.getElementById('container'), oldHTML + newHTML);

    $$('#container div').each(function (drag) {
        new Drag.Move(drag);
    });

    var noteElement = document.getElementById('N' + nextNoteId.toString());
    noteElement.style.position = "absolute";
    noteElement.style.top = (100 + (noteCount * 75)).toString() + "px";
    noteElement.style.left = (75 + (noteCount * 75)).toString() + "px";

    notefocus(nextNoteId.toString());
    document.getElementById('NT' + nextNoteId.toString()).focus();

    nextNoteId++;

    nextColor++;
    if (nextColor > 4) { nextColor = 1; }

    noteCount++;
}


// Restore a note. Create a note and set its position, heading text, and note text from parameters.

function RestoreNote(top, left, headingText, noteText) {

    if (top === undefined || top === 0 || top === "" || left === undefined || left === 0 || left === "") {
        NewNote_Click();
    }
    else {
        var newHTML = '<div id="N' + nextNoteId.toString() + '" class="stickyNote color' + nextColor.toString() + '" onfocus="javascript:notefocus(' + "'" + nextNoteId.toString() + "')" + '"><h1 id="NH' + nextNoteId.toString() + '" contenteditable="true">' + headingText + '</h1><p id="NT' + nextNoteId.toString() + '" contenteditable="true">' + noteText + '</p></div>';
        var oldHTML = document.getElementById('container').innerHTML;
        WinJS.Utilities.setInnerHTMLUnsafe(document.getElementById('container'), oldHTML + newHTML);

        $$('#container div').each(function (drag) {
            new Drag.Move(drag);
        });

        var noteElement = document.getElementById('N' + nextNoteId.toString());
        noteElement.style.position = "absolute";
        noteElement.style.top = top;
        noteElement.style.left = left;

        nextNoteId++;

        nextColor++;
        if (nextColor > 4) { nextColor = 1; }

        noteCount++;
    }
}


// Delete the note which last had focus.

function DeleteNote_Click() {
    if (noteIdWithFocus === "0") return;
    var note = document.getElementById("N" + noteIdWithFocus);
    if (note != undefined && note != null) {
        document.getElementById("container").removeChild(note);
        noteCount--;
        noteIdWithFocus = "0";
        document.getElementById("DeleteNote").style.display = "none";
    }
}


// Set the focus to a note based on relative Id and set the caption of the Delete Note button.

function notefocus(noteid) {
    noteIdWithFocus = noteid;
    WinJS.Utilities.setInnerHTMLUnsafe(document.getElementById("DeleteNote"), "Delete Note " + noteid);
    document.getElementById("DeleteNote").style.display = "inline";
}
Persistence Code
Metro apps have checkpoint (suspend) and activation events, and its important to store and restore state in these events. Originally, I did this through the WinJS.Application,sessionState object - but I found after some testing, as the name implies, that this storage is not retained past a user session. I then found I could store and retrieve JSON objects easily to file storage. That's what the code below does.
// For an introduction to the Blank template, see the following documentation:
// http://go.microsoft.com/fwlink/?LinkId=232509
(function () {
    "use strict";

    var app = WinJS.Application;
        app.onactivated = function (eventObject) {

        WinJS.Application.local.readText("stickynotes-1.db").then(
            function (data) {
                try {
                    var state = JSON.parse(data);

                    if (state != undefined && state[0].noteCount != undefined) {
                        var notes = state[0].noteCount;
                        for (var n = 0; n < notes; n++) {
                            RestoreNote(state[1].top[n], state[2].left[n], state[3].heading[n], state[4].note[n]);
                        }
                    }
                }
                catch (e) {
                    NewNote_Click();
                }
            });

        if (eventObject.detail.kind === Windows.ApplicationModel.Activation.ActivationKind.launch) {
            if (eventObject.detail.previousExecutionState !== Windows.ApplicationModel.Activation.ApplicationExecutionState.terminated) {
                // This application has been newly launched. Initialize
                // your application here.
            } else {
                // This application has been reactivated from suspension.
                // Restore application state here.
            }
            WinJS.UI.processAll();
        }
    };

    app.oncheckpoint = function (eventObject) {
        // This application is about to be suspended. Save any state
        // that needs to persist across suspensions here. You might use the
        // WinJS.Application.sessionState object, which is automatically
        // saved and restored across suspension. If you need to complete an
        // asynchronous operation before your application is suspended, call
        // eventObject.setPromise().

        var state = new Object();
        var data = noteCount.toString();

        state.noteCount = noteCount;

        state.heading = [];
        state.note = [];
        state.top = [];
        state.left = [];

        for (var n = 0; n < noteCount; n++) {
            var note = document.getElementById("N" + (n + 1).toString());
            var heading = document.getElementById("NH" + (n + 1).toString());
            var noteText = document.getElementById("NT" + (n + 1).toString());
            state.top.push(note.style.top);
            state.left.push(note.style.left);
            state.heading.push(heading.innerText);
            state.note.push(noteText.innerText);
            data = data + "|" + note.style.top + "|" + note.style.left + "|" + heading.innerText + "|" + noteText.innerText;
        }

        var myDataSource = [
            { noteCount: noteCount },
            { top: state.top },
            { left: state.left },
            { heading: state.heading },
            { note: state.note }
        ];

        WinJS.Application.local.writeText("stickynotes-1.db", JSON.stringify(myDataSource)).then();

    };

    app.start();
})();
Icons and Splash Screen
Metro apps have several size logo images and a splash screen image, which by default are black-and-white and rather plan, I created versions of these images for Sticky Notes from screen captures of the application, trimmed to the size of the original icons. Here's how the app appears on the Metro start screen:

Usage
The completed app launches and restores and previously saved notes. If it's being launched for the first time, it creates an initial note.
To create a note, the user clicks the New Note button at top left. To delete a note, select the note and then click the Delete Note button that appears at top left. To drag a note, click and hold a note outside of the editable text area, drag and release.,
To edit a note, the user can click and edit the heading or the body This is done with the HTML5 ContentEditable feature, which allows the HTML elements to be directly editable in the browser without the use of form fields. Although the note shape is nominally square, it will stretch vertically for longer notes.

Summary
The source code to Sticky Notes can be downloaded here.
It took a full day and night to get here--with some frustrations along the way--but I'm pleased with the result of my first Windows 8 Metro application, and I certainly learned a lot. Time to start thinking about what to create next...
Subscribe to:
Posts (Atom)